Security is a primary concern for most linux administrators. While it is obviously careless to leave remote access unsecured, the protection of data at rest is easily overlooked - but anyone with physical access to an unencrypted harddrive can bypass any and all authentication by just plugging it into a different computer.
Linux disk encryption
While there are many different configurations, the most common is a combination of a LUKS header, using dm-crypt to encrypt the actual drive contents. LUKS stands for Linux Unified Key Setup, which is a special formatting at the beginning of an encrypted partition that stores the encryption key, passphrases and metadata about the encryption like the cipher and cipher mode used.
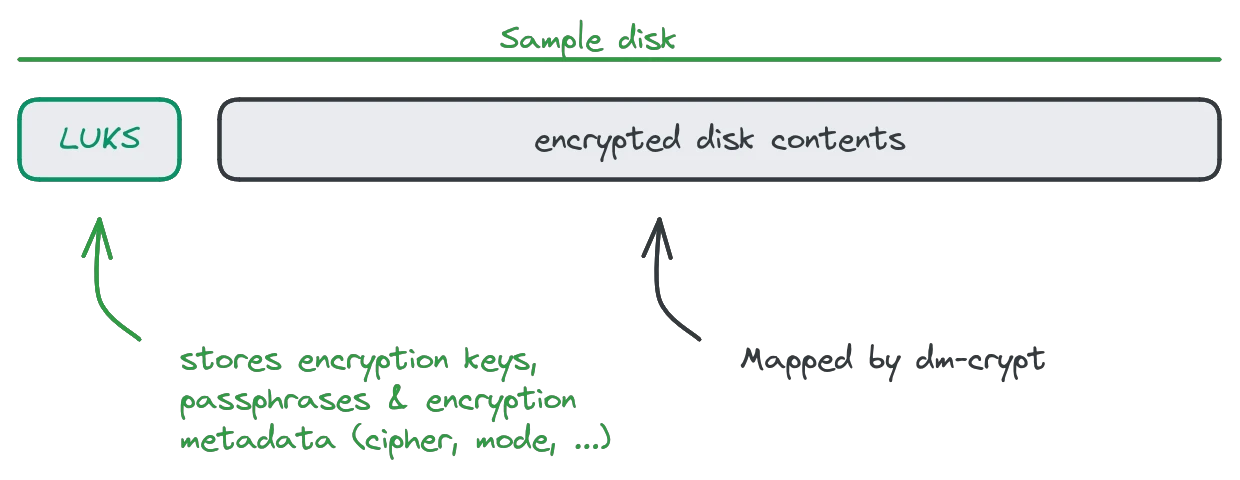
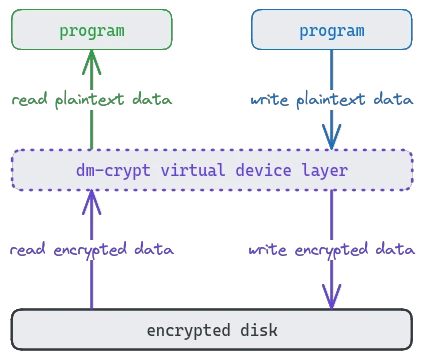
Dm-crypt is a kernel subsystem in linux that abstracts the encryption away from programs using an encrypted disk. The "dm" stands for "device mapper", which refers to dm-crypt's functionality: It maps a physical device (harddrive) to a virtual device, which handles the encryption. Programs can use the virtual device like a normal harddrive and do not need to know anything about the encryption process, as the virtual device takes care of that process.
The tool used to manage encrypted disk operations in linux is cryptsetup, which may not be installed on all distributions by default
sudo apt install cryptsetupNote that LUKS and dm-crypt aren't actual algorithms to encrypt anything. LUKS is format used to store metadata, the most recent variant in use being LUKS2. Dm-crypt supports many different encryption algorithms, with the default for cryptsetup being aes-xts-plain64.
Finding the correct disk
This step is probably the most important: find the correct harddrive. Encrypting a disk means destroying all data stored on it, so be careful to select the right disk - there is no way to undo damage to your data if you pick the wrong one!
List all your disks and partitions (block devices):
lsblkThe output will look similar to this:
NAME  MAJ:MIN RM SIZE RO TYPE MOUNTPOINTS
sda     8:0   0  20G 0 disk
├─sda1  8:1   0  19G 0 part /
├─sda2  8:2   0   1K 0 part
└─sda5  8:5   0 975M 0 part [SWAP]
sdb     8:16  0   5G 0 disk
Find the correct device to encrypt. In the example above, there are two disks: sda and sdb. The lines connected to sda with lines show partitions on the disk, often an indicator that the disk is being used to store something at the moment.
Once you found the right device, you can access it through the device file in /dev, so disk sdb can be acessed through the file /dev/sdb.
All further examples will use /dev/sdX in place of the disk name, to hopefully prevent accidental data loss by running copy/pasted commands without adjusting the disk identifier. Replace /dev/sdX with the real disk name you want to encrypt.
Encrypting a disk
The first step in encrypting a disk is to create a LUKS header to store encryption metadata:
sudo cryptsetup luksFormat /dev/sdXThe command will have you verify that you are sure about the consequences of the command, then ask for a passphrase:
WARNING!
========
This will overwrite data on /dev/sdb irrevocably.

Are you sure? (Type 'yes' in capital letters): YES
Enter passphrase for /dev/sdb:
Verify passphrase:
Note that the disk contents are encrypted with a generated key, and the passphrase is only used to encrypt that small key.
When encrypting a disk, you will see a lot of talk about overriding the disk. The reason is very simple: cryptsetup doesn't encrypt the empty space on a disk until it needs it to store data, so an attacker can make assumptions about how much data is stored on an encrypted disk without decrypting it.
To prevent that problem, you can open the disk and write zeroes to the dm-crypt wrapper, storing encrypted zeroes on the underlying physical disk (effectively encrypting the empty space):
sudo cryptsetup open /dev/sdX encrypted_disk
sudo dd if=/dev/zero of=/dev/mapper/encrypted_disk bs=4M status=progress
The first command will ask for the passphrases you created previously, the second will show some live statistics about the writing process, and end with a message like:
5213519872 bytes (5.2 GB, 4.9 GiB) copied, 16 s, 326 MB/s
dd: error writing '/dev/mapper/encrypted_disk': No space left on device
1277+0 records in
1276+0 records out
5351931904 bytes (5.4 GB, 5.0 GiB) copied, 18.0591 s, 296 MB/s
Note the error message in the output:
dd: error writing '/dev/mapper/encrypted_disk': No space left on deviceThis error is expected: if we cannot write any more zeroes to the device because it is full, then we have overridden all empty space on the device.
Now that the device is ready, create a filesystem on the virtual device. A classic choice is EXT4:
sudo mkfs.ext4 /dev/mapper/encrypted_diskThe output will provide info on the created filesystem:
mke2fs 1.47.0 (5-Feb-2023)
Creating filesystem with 1306624 4k blocks and 327040 inodes
Filesystem UUID: 51cad76b-9ab6-45b1-831b-479e426040b5
Superblock backups stored on blocks:
   32768, 98304, 163840, 229376, 294912, 819200, 884736

Allocating group tables: done
Writing inode tables: done
Creating journal (16384 blocks): done
Writing superblocks and filesystem accounting information: done
Close the device mapper to finish the process:
sudo cryptsetup close encrypted_diskYou may find some suggestions to first override the disk with /dev/urandom before formatting it. While this is good advice for older encryption ciphers, cryptsetup defaults to aes-xts-plain64, which has builtin protection against finding patterns in the encrypted data. Both approaches are equally secure, but overriding first with /dev/urandom takes significantly longer (many many hours depending on disk size), for no added benefit.
Using an encrypted disk
To use an encrypted disk, it needs to be mapped to a virtual dm-crypt device first. This is done by opening the device:
sudo cryptsetup open /dev/sdX encrypted_diskThe command will ask for the passphrase, then return. The last argument encrypted_disk is the name of the virtual device, which is available under /dev/mapper after creation (/dev/mapper/encrypted_disk in this example). The virtual device can now be mounted anywhere like a normal disk:
sudo mount /dev/mapper/encrypted_disk /mnt/my_dataYou can now access your encrypted drive's data under /mnt/my_data as if it were a normal disk.
When you are done working with the disk, first unmount it, then close the virtual device:
sudo umount /mnt/my_data
sudo cryptsetup close encrypted_disk
If you only need to "pause" the disk but don't want to go through the entire open/mount process again, you can suspend the virtual device:
sudo cryptsetup luksSuspend encrypted_diskA suspended virtual device for an encrypted disk will block all access until it is resumed, without breaking the mount point or otherwise interfering with programs acessing it (some read operations may still complete successfully because of filesystem caching). The encryption key is wiped from memory, so access to the suspended device cannot be restarted until the passphrase is typed again.
The device can be resumed with:
sudo cryptsetup luksResume encrypted_diskAfter typing the correct passphrase, all pending operations on the mounted virtual device can now complete normally and the device functions as a typical disk again.
Making LUKS header backups
Storage media die. This is true for plain and encrypted disks, but encrypted disks are at larger risk of storage failure, because if the LUKS header gets damaged, the entire disk becomes unusable. The latest version LUKS2 has some built-in protection against data corruption and even repair mechanisms for some of it, but nothing replaces a LUKS header backup in case of need:
sudo cryptsetup luksHeaderBackup /dev/sdX --header-backup-file luks.backupNote that to make a header backup, you use the raw disk device, not the opened dm-crypt virtual device. The above command produces a file called luks.backup, which contains the contents of the LUKS header for the disk /dev/sdX.
Keep this file in a safe place. It contains the hashes of your encryption passphrases, and can be used to run a brute-force attack to crack the contained passwords.
Fixing LUKS header damage
This advice is only valid for cryptsetup default settings, using the LUKS header for metadata storage. If you used other encryption algorithms or tools to create the encrypted disk, this may be of limited help to you.
If you try to access your encrypted disk and see an error like these:
Command failed with code 22: Failed to read from device /dev/sdXDevice /dev/sdX does not contain a valid LUKS header.LUKS header checksum failed on device /dev/sdXKey material section corrupted on device /dev/sdXInvalid LUKS1 header on device /dev/sdX: Invalid magic bytes at header offset 0device-mapper: reload ioctl on failed: Invalid argument Failed to setup dm-crypt key mapping for device /dev/sdX. Check that kernel supports aes-xts-plain64 cipher (check syslog for more info).You have a good chance to fix the problem. The first step is to let cryptsetup try to recover the damaged header by itself:
sudo cryptsetup repair /dev/sdXDepending on the damage to the disk, it may produce differing output (or non at all). If nothing was damaged, the command does nothing. For most types of corruption, this should restore the LUKS header and make the encrypted volume capable to open and mount again. If this doesn't help, you really need to have a backup of the LUKS header (you made one, right?). The header can be easily restored to the disk:
sudo cryptsetup luksHeaderRestore /dev/sdX --header-backup-file luks.backupReplace luks.backup with the name of your LUKS header backup file. After restoring the header, the volume should operate as normal again.
Detached LUKS header
For a more paranoid security setup, the LUKS header can be stored outside of the encrypted disk. The advantage of this approach is that an attacker who gains physical access to the disk not only knows what cipher or cipher mode was used to encrypt the disk, they cannot even tell whether the disk is encrypted or contains garbage / random data. All kinds of brute-force attacks are impossible without the LUKS header (containing the encryption key) as well.
A disk can be encrypted with detached LUKS header during the formatting stage:
sudo cryptsetup luksFormat --header header.img /dev/sdXThe file header.img now contains the LUKS header. When opening the device for use, you need to specify the file:
sudo cryptsetup luksOpen --header header.img /dev/sdX encrypted_driveThe encrypted disk can only be used in combination with the header.img file, having only one or the other is useless. The header file is also an easy point of failure now, so make sure to keep it backed up in multiple locations.
Managing key slots
The LUKS header format supports multiple keys for disk access, providing a way to use several different passwords to decrypt the disk. LUKS2 supports up to 32 key slots per disk, but should be used with caution: every added key is a possible attack vector for brute-force or social engineering attacks.
To get a list of the current encryption metadata including keys, you can quickly get a header dump:
sudo cryptsetup luksDump /dev/sdXThe output contains a lot of information about encryption cipher and settings, as well as all key slots.
A new key can be added at any time:
sudo cryptsetup luksAddKey /dev/sdXThis will first prompt for any existing passphrase, then ask for a new one to be added. Once complete, the disk can now be opened with either the old or the new passphrase. To remove a passphrase, you only need to know the passphrase itself:
sudo cryptsetup luksRemoveKey /dev/sdXThe command will prompt you for the passphrase to remove. If it is valid, it will be removed from the LUKS header immediately.
To replace an existing passphrase, you can either first remove the old and then add the new one, or use change it in-place all at once:
sudo cryptsetup luksChangeKey /dev/sdbYou are first prompted for the passphrase to change, then for the new one to replace it with.
Using key files instead of passphrases
LUKS supports files as keys, if passphrases are undesirable. The file to use as a key can be anything: a text file, an RSA private key or a photo of your beloved pet:
sudo cryptsetup luksAddKey /dev/sdb my_pet.pngAs with the normal key adding process, you are prompted for any existing passphrase first, then the new key will be added. When opening the drive, specify the key file with the --key-file flag:
sudo cryptsetup open --key-file my_pet.png /dev/sdX encrypted_diskNote that using files as keys requires special considerations: cryptsetup will typically only use the first 8MB of the file for key derivation, so using excessively large files may be pointless. Larger files will inevitably make LUKS operations slower, as the entire key needs to be read and processed first. Some file types are more prone to unexpected changes, for example image files through conversion or compression. The resulting file may visually look the same, but cryptsetup needs the bytes to be the same.
If you want to use a key file, but don't want to use an existing one, you can quickly generate a file with random contents:
sudo dd if=/dev/urandom of=my.key bs=1024 count=4
sudo chmod 400 my.key
For even more security, use /dev/random instead of /dev/urandom (may be much slower). The generated file my.key is well-suited for use as a LUKS key.
Note that any kind of key file is vulnerable to data corruption, like any other file on storage media. Make sure to keep backups on multiple storage devices, but take care to keep them safe from potential attackers - the key file is as valuable as any passphrase you set up!
Converting disk encryption
The cryptsetup command contains the reencrypt directive. Usually, this is used to change encryption settings, like ciphers, cipher modes or key sizes, but can also be used for more practical purposes.
It can convert an existing, unencrypted disk into an encrypted LUKS device retroactively (while keeping all stored data):
sudo cryptsetup reencrypt --type luks2 /dev/sdXThis has almost the same effect as running luksFormat, then copying the old data to the encrypted drive. One major drawback is that the free space on the disk cannot be overridden with this approach, so leaks from deleted data fragments or assumptions about storage size are open to possible attackers.
An existing encrypted disk can also be converted back into an unencrypted, plain disk this way:
sudo cryptsetup reencrypt --decrypt /dev/sdXNote that encrypting or decrypting an entire disk this way may take a very long time and put serious load on your CPU and disk bandwidth.
We won't show samples of adjusting existing encryption params because doing that without a very good understanding of what you are doing can cause serious damage to your device, data integrity or the security of the encryption. See man cryptsetup for a guide on how to use that feature.
Killing an encrypted disk
If you want to permanently, irrecoverably destroy all data on an LUKS encrypted disk, all you need to do is erase the LUKS header:
sudo cryptsetup erase /dev/sdXThe operation safely removes and overrides the LUKS header portion on the drive, making the encrypted contents permanently inaccessible. There is no way to recover from this process, so be extremely careful when using it!
Removing unknown keys
In some rare circumstances, you may find yourself in a situation where a LUKS disk supports a key you want to delete, but you don't have the key/passphrase anymore. The key slot itself can be erased easily with:
sudo cryptsetup luksKillSlot /dev/sdX 10Where 10 is the number of the slot to erase. The tricky part is to find the key slot that the lost key is stored in. Unfortunately, there is no other way than to check manually: for every other passphrase and key, check what slot they are in and make a note. The slot left when all others are assigned to known keys is the one you are looking for. This process can be extremely tedious, so here is a bash script that automates the checking for each key file or passphrase for you:
#!/bin/bash

# Function to print usage
usage() {
   echo "Usage: $0 [-k keyfile | -p] <device>"
   echo " -k keyfile : Use a keyfile"
   echo " -p        : Use a passphrase (will prompt)"
   echo " device    : LUKS device (e.g., /dev/sda1)"
   exit 1
}

# Check if cryptsetup is installed
if ! command -v cryptsetup &> /dev/null; then
   echo "Error: cryptsetup is not installed."
   exit 1
fi

# Parse arguments
while getopts "k:p" opt; do
   case $opt in
       k) KEYFILE="$OPTARG" ;;
       p) USE_PASSPHRASE=1 ;;
       *) usage ;;
   esac
done

# Shift to the device argument
shift $((OPTIND-1))

# Check if device is provided
if [ $# -ne 1 ]; then
   usage
fi

DEVICE="$1"

# Check if the device exists
if [ ! -b "$DEVICE" ]; then
   echo "Error: Device $DEVICE does not exist or is not a block device."
   exit 1
fi

# Check if it's a LUKS device
if ! cryptsetup isLuks "$DEVICE"; then
   echo "Error: $DEVICE is not a LUKS device."
   exit 1
fi

# Get the number of key slots
SLOT_COUNT=$(cryptsetup luksDump "$DEVICE" | awk '/Keyslots:/ {flag=1; next} flag && /^[^[:space:]]/ {flag=0} flag' | grep -cE '^ [0-9]+:')

# Handle passphrase input if -p was used
if [ -n "$USE_PASSPHRASE" ]; then
   echo -n "Enter passphrase: " >&2
   read -s PASSPHRASE
   echo >&2
fi

# Try each slot
echo "Testing up to $SLOT_COUNT key slots"
for ((slot=0; slot<SLOT_COUNT; slot++)); do
   echo "Testing key slot #$slot"
   if [ -n "$KEYFILE" ]; then
       if cryptsetup luksOpen --test-passphrase -S "$slot" --key-file "$KEYFILE" "$DEVICE" 2>/dev/null; then
           echo "Key found in slot $slot"
           exit 0
       fi
   elif [ -n "$USE_PASSPHRASE" ]; then
       if echo "$PASSPHRASE" | cryptsetup luksOpen --test-passphrase -S "$slot" "$DEVICE" 2>/dev/null; then
           echo "Key found in slot $slot"
           exit 0
       fi
   else
       echo "Error: Neither keyfile nor passphrase specified."
       exit 1
   fi
done

echo "Key not found in any slot"
exit 1
You need to run this script for every passphrase and every key file associated with the encrypted disk, to figure out what slot they are stored in, then use the previous luksKillSlot command to erase the one that is left over at the end.