Security is a primary concern for most linux administrators, but keeping track of all the possible exploits, vulnerabilities and misconfigurations can be a daunting task. To minimize the risk of skipping over important fixes, security audits are a necessary process to ensure systems are configured properly.
Getting started with OpenSCAP
The OpenSCAP tool is an open source software to audit compliance with industry standard security policies like CIS or DISA-STIG. In addition to creating compliance reports, it can also automatically fix (remediate) conflicts and security vulnerabilities, without human intervention. SCAP stands for Secure Content Automation Protocol.
Common security standards
Before using OpenSCAP, we need to choose what standard (profile) we want our system to comply with. You can list all available standards on your RockyLinux distribution with this command:
oscap info /usr/share/xml/scap/ssg/content/ssg-rl9-ds.xmlAdjust the rl9 part in the filename for your rockylinux version, e.g. rockylinux 8 would use rl8 instead.
The output will list several profiles available to the local system. For security hardening of linux servers, the most common standards are:
CIS Benchmark Level 1
xccdf_org.ssgproject.content_profile_cis_server_l1: Basic security hardening with minimal impact on system usability, suitable for general-purpose environments.CIS Benchmark Level 2
xccdf_org.ssgproject.content_profile_cis: Stricter security configurations, may have more impact on usability. Ideal for high-security environments like financial or healthcare systems.DISA-STIG
xccdf_org.ssgproject.content_profile_stig: Highly detailed and strict security guidelines, mandated for systems used by the U.S. Department of Defense and its contractors. Generally overkill outside of military or government applications.
Note that the sample profiles above are intended for servers, workstations have different profiles available in the output of the oscap info command.
Creating a testing environment
Before running any commands, be warned that the next steps will make permanent changes to your system. If you just want to try or learn about OpenSCAP, you should do so in a virtual machine or unused computer. You can set one up quickly with vagrant:
vagrant init rockylinux/9
vagrant up
vagrant ssh
This should give you a fully functional rockylinux distribution to play around with, without risking damage to your local system.
OpenSCAP can be installed from rockylinux official software repositories:
sudo dnf install scap-security-guide openscap-scannerThe scap-security-guide package provides several default profiles for common security standards, so you don't have to search for them on the internet.
Evaluating Compliance
For this example, we are using the CIS Benchmark level 2 to strike a balance between high security and commercial viability of the system. The server's current compliance with the chosen standard can be checked with the oscap xccdf eval command:
sudo oscap xccdf eval \
  --profile xccdf_org.ssgproject.content_profile_cis \
  --report compliance-report.html \
  /usr/share/xml/scap/ssg/content/ssg-rl9-ds.xml
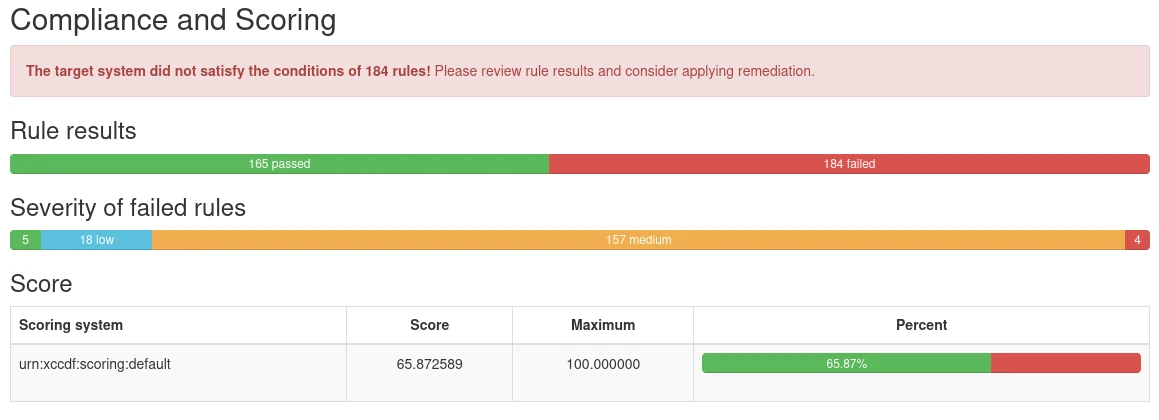
The test will produce a lot of text output on the terminal, and write a an HTML report to compliance-report.html in the current directory. The report contain an overview of overall compliance with the chosen profile:
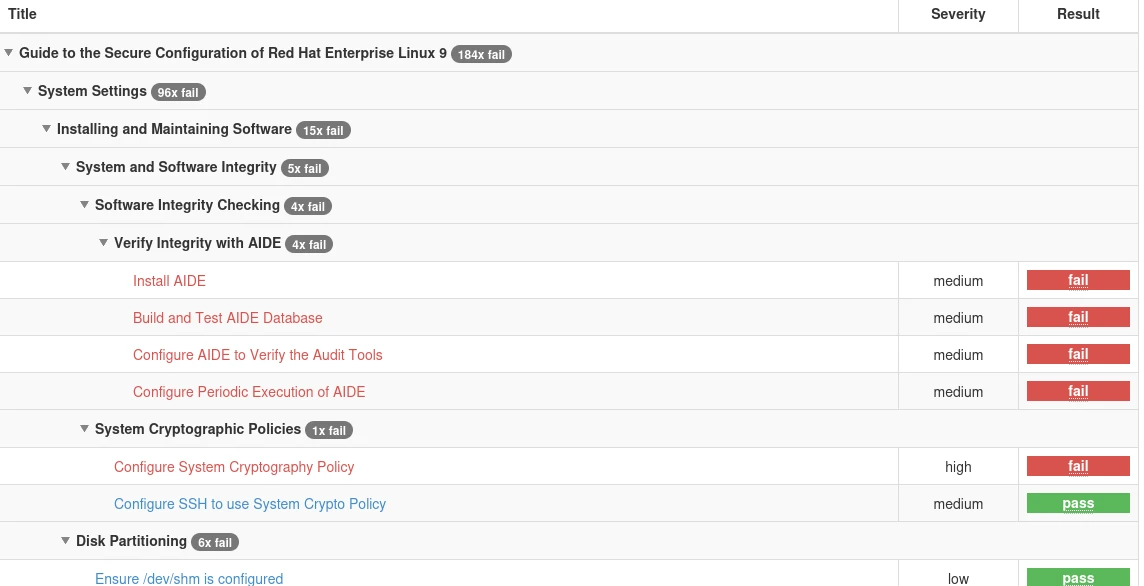
As well as a list of rules that failed to validate:
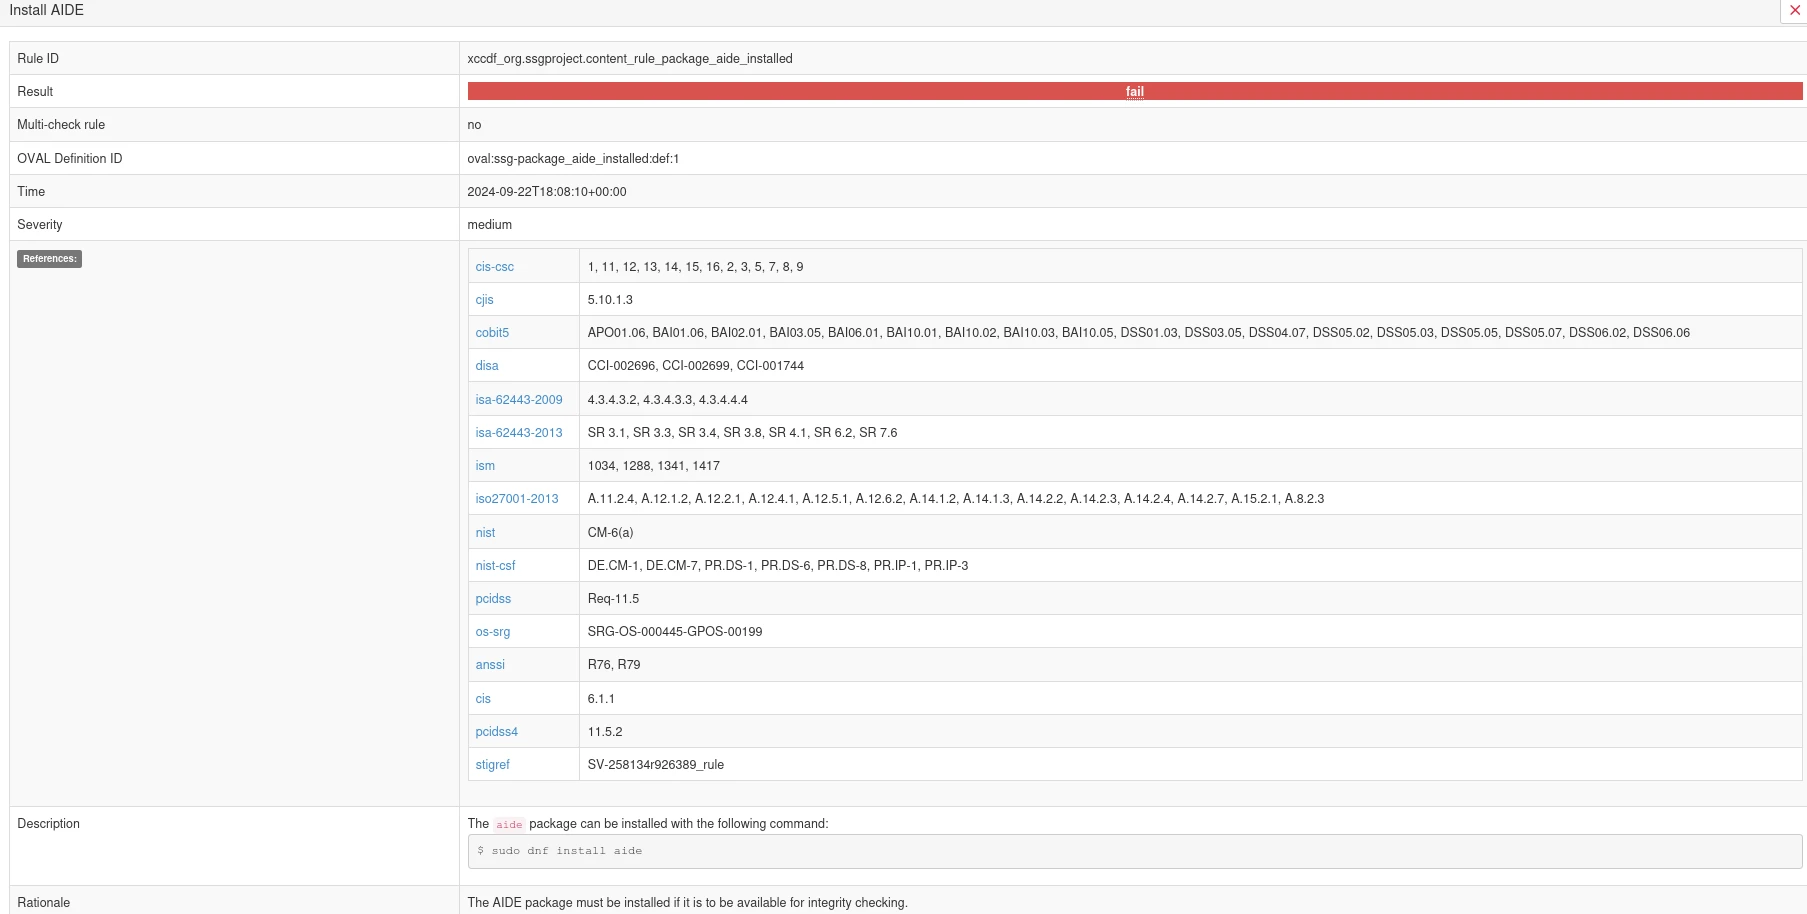
Clicking on a rule provides detailed information of what was tested, why it is important, and how to fix the problem:
It is normal for freshly-installed systems to fail quite a few tests on the first run, most of which are easily fixed.
Remediating issues
One of OpenSCAP's key features is it's ability to automatically remediate (aka fix) issues found during evaluation. This can be done in a few ways, for example by generating a shell script with all the needed fixes and running it:
sudo oscap xccdf generate fix \
  --profile xccdf_org.ssgproject.content_profile_cis \
  /usr/share/xml/scap/ssg/content/ssg-rl9-ds.xml > remediate.sh
sudo bash remediate.sh
This method is generally preferred, as it allows administrators to first check what changes would be made to the system before applying them. If no such verification is desired (for example in newly installed environments), remediation can be done during evaluation with the --remediate flag:
sudo oscap xccdf eval \
  --remediate \
  --profile xccdf_org.ssgproject.content_profile_cis \
  --report compliance-report.html \
  /usr/share/xml/scap/ssg/content/ssg-rl9-ds.xml
This method is generally faster, at the cost of operator control. The generated report will also mark each test that was failed but remedied to show what was changed.
Some issues, such as improper partitioning schemes, cannot be automatically remediated. These will fail even after remediation and need manual intervention.
Customizing audits and remediation
While common security standards are a great starting point for security hardening, they may not always meet the needs of your organization or environment. In order to adjust their requirements to your specific needs, you can create a tailoring file to selectively disable some checks. or changing their severity.
Here is a sample tailoring file:
<?xml version="1.0" encoding="UTF-8"?>
<xccdf:Benchmark id="xccdf_custom_tailoring"
   xmlns:xccdf="http://checklists.nist.gov/xccdf/1.1">
   <xccdf:Profile id="xccdf_custom_profile">
      <xccdf:title>My Custom Tailored Profile</xccdf:title>
      <xccdf:description>This is a tailored profile to exclude specific rules</xccdf:description>
      <!-- Exclude specific rules -->
      <xccdf:select idref="xccdf_org.ssgproject.content_rule_disable_ipv6" selected="false"/>
      <xccdf:select idref="xccdf_org.ssgproject.content_rule_auditd_data_retention" selected="false"/>
   </xccdf:Profile>
</xccdf:Benchmark>
The sample tailoring file disables the rules for disabling IPv6 and auditd data retention. The specific names for each rule can be found in the generated HTML report, by viewing it's details by clicking on the desired rule from the list.
The tailoring file can be passed to evaluation or remediation with the --tailoring-file flag:
sudo oscap xccdf eval \
  --profile xccdf_org.ssgproject.content_profile_cis \
  --tailoring-file custom_tailoring.xml
  --report compliance-report.html \
  /usr/share/xml/scap/ssg/content/ssg-rl9-ds.xml
Using tailoring files ensures that unwanted rules are excluded permanently from all OpenSCAP runs, without changing the underlying profile.


