Large scale applications are often a complex network of microservices and API endpoints, each fulfilling an important role for the overall functionality o the application. While unit testing can catch many logic errors, having a second layer of testing that is decoupled from the source code itself helps maintain more reliable product quality.
What is bruno?
Bruno is an application to develop and test HTTP-based APIs, comprised of a graphical desktop application, custom file formats to store endpoint and testing configurations and a command-line application to run tests in headless environments liek ci/cd pipelines.
The configuration files generated by bruno through the GUI application are a simple text-based format, which can be easily versioned along the API's source code, making the environment available to all developers in the team. Bruno works fully offline if desired and allows complex test assertions through custom javascript code.
Testing a simple endpoint
For testing purposes, you can use the publicly available reqres.in service as a mock API. Start by creating a new collection and a new request within that collection, then go over to the "Assert" tab to add assertions for your test case:
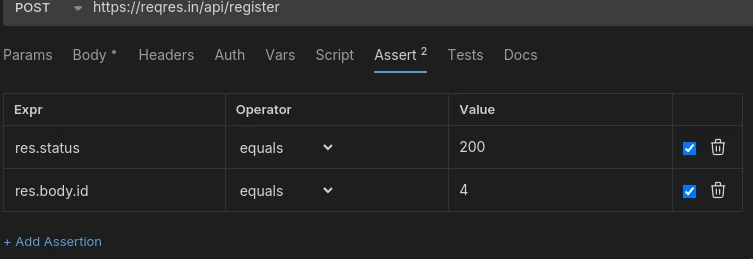
This is a primitive test case, simply verifying that the response code is 200 (indicating success) and the generated user id is 4 (this is static for the mock api service). You can write more complex test cases in the "Tests" tab next to the assertions, but only in javascript, which your team may not be familiar with. Most test cases should be simple enough to express as a set of assertions, keeping the complexity of your bruno config to a minimum.
For testing, you have access to a javascript object named res containing the response code at res.status, headers at res.headers, as well as the response body at res.body. If the response body was encoded as JSON, it is automatically decoded into the object, which is why we can access the response's id property directly through res.body.id without any further logic (see res object docs). This simple subset of information will be enough for most test cases, but for more complex usage you also have the entire javascript ecosystem available if you desire (but this is beyond the scope of this article, start here if you are interested in that).
Multiple tests per endpoint
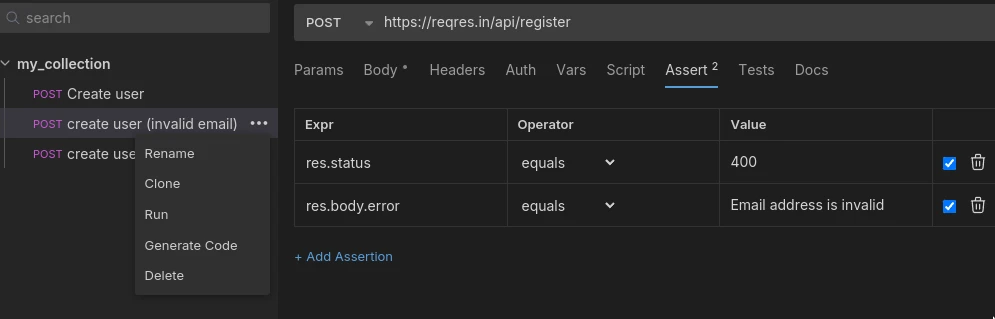
A single test case is often not enough for comprehensive testing of an endpoint. Especially for APIs, you not only want to make sure that a request that should succeed actually works, but also that a failed request behaves as expected (status code, error message, properly rejecting bad requests/params, ...). A eral-world API will likely need multiple tests for each endpoint, ensuring that both working and failing requests return correct responses.
There is no way to add multiple separate test cases for a single request, but you can right-click your first test request and "clone" it, then adjust the name/assertions for the newly created copy. This way, you would create multiple requests for the same endpoint, one for each test case:
To run all tests at once, simply right-click the collection in the list on the left and choose "run" to run all requests (tests) for the entire collection in order.
Collection variables
Having multiple requests means a lot f duplicate data, for example the base url address of the api in each request's address. When changing that, for example within testing environments, the previous approach would need you to edit all request urls manually. Bruno has got this edge case covered with collection variables, allowing you to specify variables that can be substituted across all requests within the collection in many places, like the url address, params or assertion values.
You can access the collection's variables by right-clicking the collection on the left and choosing "Settings", then switching to the "Vars" tab:

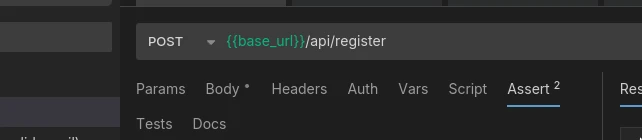
In the example, we defined a variables named base_url with the host portion of our target API. This can now be substituted in requests with the {{base_url}} placeholder, which gets replaced with the variable's value:
There are two types of collection variables: Pre request variables which are available before making the request (for request body/params, urls etc) and post request variables, mostly used in advanced test cases.
Using previous response contents in dynamic variables
Depending on your API's logic, you may need some data from a previous response for a future request, for example a valid auth token after logging in, or a generated user id after signing up. Be aware that the request's "Vars" tab is not the right place for this, as variables defined there are request variables, which are only accessible to the request they were defined in.
To share a dynamic variable within a collection, we need to create a runtime variable (an ephemeral variable which only exists while the tests run). This can be done from a request's "Script" tab, where you call bru.setVar() from the post request script:

The example above registers the response's id field as a variable called user_id, which can now be used in subsequent requests from the same collection, just like any other collection variable. Be aware that this depends on order; the variable user_id is only available after the request setting it ran, so when manually running tests, you may need to run this one first to make the variable available.
Running the entire collection's tests will execute all requests in the order they are listed on the left in the bruno application. You can adjust the order there through drag & drop, which also changes the sequence in which they are executed.
Running tests with bruno-cli
In order to run bruno tests without a graphical application, you need to install the bruno-cli tool bru:
npm install -g @usebruno/cliAfter installation, you can execute a collection's tests in order (just like from the gui) by running:
bru run --env-var base_url="https://reqres.in"This command has to be executed in the same directory where the bruno config (the generated .bru files) are stored. Any collection variables you defined must be specified at the command line as well using the --env-var flag. Running tests shows some information about progress and test status:
Running Folder Recursively

Create user (200 OK) - 194 ms
  ✓ assert: res.status: eq 200
  ✓ assert: res.body.id: eq 4
create user (invalid email) (400 Bad Request) - 151 ms
  ✓ assert: res.status: eq 400
create user (empty email) (400 Bad Request) - 156 ms
  ✓ assert: res.status: eq 400
  ✓ assert: res.body.error: eq Missing email or username

Requests:   3 passed, 3 total
Tests:      0 passed, 0 total
Assertions: 5 passed, 5 total
Ran all requests - 501 ms

Requests:   3 passed, 3 total
Tests:      0 passed, 0 total
Assertions: 5 passed, 5 total
The command's exit code reflects if all tests succeeded or not; 0 means all tests passed. If a non-zero exit code is returned, at least one test or assertion failed, making it easy to integrate it into ci/cd pipelines through simple shell scripting.
A more polished HTML report can also be generated by appending the --reporter-html flag with a filename to output to:
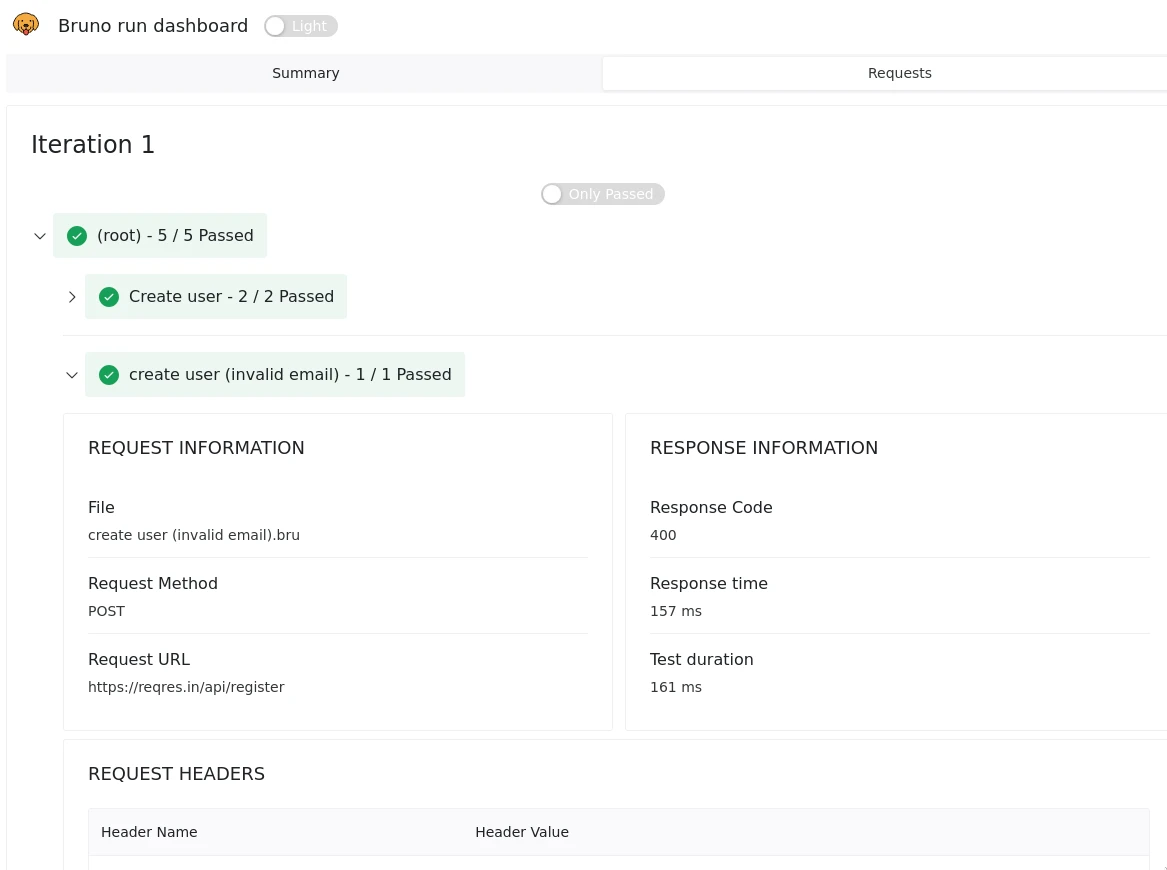
bru run --env-var base_url="https://reqres.in" --reporter-html report.htmlThe generated report.html file can then be opened in a browser, showing a summary:

Clicking on the "Requests" tab on the top right reveals detailed information about all requests and tests executed for the collection: