When building software, chances are you will come across an HTTP API sooner or later. No matter how amazing it's logic may be, without proper documentation it will be of little to no use for real world users. Documentation can make the difference between a low-friction user experience and being flooded with support tickets. Let's look at the industry standard for documenting HTTP API endpoints: The OpenAPI specification.
What is OpenAPI?
Essentially, the OpenAPI specification is simply a special yaml file describing your API, it's endpoints, allowed request methods, parameters and return values. Your entire documentation will be contained in a single file, that could even be hosted on the API itself. This file can then be processed both automatically by code generators, or rendered into more user-friendly visual representations, like HTML or Markdown.
The benefits of using OpenAPI documentation
Getting started with writing documentation using OpenAPI may seem daunting at first, but there are great benefits to going through the effort:
Streamlined documentation: Since all important key components like endpoints, parameters, types and responses are defined in the format itself, they will remain consistent throughout the entire documentation, making them easily scannable for readers.
Easy collaboration: Since it is just a single text file, it is trivial to share it with others, use common code versioning tools for collaboration like git or svn, or even make it available through an API endpoint itself.
Object reuse: APIs often use similar markup in multiple places. A user for example, may always have the same JSON structure, but be used when fetching a single user, when searching for usernames or when retrieving the author of a blog post. OpenAPI allows us to define a common User object and simply link it in the documentation for all endpoints that may return or receive it.
Easy validation: Writing documentation is not exempt from errors. Having a typo in a documentation endpoint can lead to a lot of frustration on the user's end. Some OpenAPI editors allow you to quickly test documentation while you are writing it, by making live HTTP requests.
Automation: The standardized nature of the format makes it possible for other code to read and process the contained information. This leads to higher automation, for example through tools like openapi-generator that can generate human-readable visual documentation, and even API clients and servers from a simple OpenAPI yaml file.
Documenting a sample API
Let's assume we have a sample HTTP REST API dealing with basic user information and responding with JSON. It has the following endpoints:
/user: Expects POST request with form fields "name" and "age" to create a new user account. Responds with HTTP 201 on success, with the generated user id in the response body, or HTTP 500 with an error message.
/user/<user-id>: Expects GET request. <user-id> is the generated unique id of the user. Responds with HTTP 200 and user information on success, or HTTP 404 if id not found
/users: Expects GET request. Responds with HTTP 200 and array of user information, or HTTP 500 on error. Optional query parameters:
max_resultsto limit number of results returned, between 1 and 100, defaults to 30.offsetto skip number of items before returning results, defaults to 0.orderto control sorting order, either "asc" for ascending or "desc" for descending, defaults to "asc".
Although this is a very small API, it is quite complex: It has multiple HTTP request methods, required and optional parameters both in the request path and request query.
API information and metadata
Writing an OpenAPI documentation for this starts with some meta information. We will keep it very basic for brevity. If you want to follow along, you can use the free swagger editor to try it out online.
openapi: 3.0.3
info:
 title: User API
 description: |-
   A sample API for user information
 version: 1.0.0
servers:
 - url: http://sample.com/api/v1
This is the beginning of our documentation, containing some basic metadata about the API itself. Take note of the servers key: If the provided url is pointing to a real API server, you can test your documentation live by making requests to it from the editor.
Endpoint /user: form data and responses
Our first endpoint is used to create users. Endpoints are defined under the yaml key paths, starting with the path itself. The basic information about the endpoint is specified like this:
paths:
 /user:
   post:
     summary: Create a new user
     description: Stores a new user object
We define the path /user, then add some descriptions for post requests made to this path.
Next, we need to specify our variables name and age, which are required to create a new user. We do this by defining what the requestBody should look like:
requestBody:
  content:
    multipart/x-www-form-urlencoded:
      schema:
        type: object
        required:
          - name
          - age
        properties:
          name:
            type: string
            example: Sam
            description: Name of the user
          age:
            type: integer
            example: 25
            description: Age of the user
This may seem a lot, but it is quite simple. From top to bottom: We define that the contents of the request body have to be encoded as content type multipart/x-www-form-urlencoded (this is the default for post requests made from html forms). We then create a schema for the request and declare that both name and age are required form fields. Lastly, we define what the values for the name and age fields should look like under properties.
The last part of an endpoint documentation is the responses key, defining what responses the server may return:
responses:
 "201":
   description: User created
   content:
     application/json:
       schema:
         type: object
         properties:
           id:
             type: integer
             example: 192
             description: ID of newly created user
 "500":
   description: Server error
   content:
     application/json:
       schema:
         type: object
         properties:
           message:
             type: string
             example: An error occured while processing the request
             description: Message describing the error
A response starts with the HTTP status code returned and a description. Under content, we define the returned content type as application/json. Finally, we specify which fields will be present in the JSON response (the generated user id as integer, or an error message of type string).
Putting it all together, our first endpoint will look like this:
paths:
 /user:
   post:
     summary: Create a new user
     description: Stores a new user object
     requestBody:
       content:
         multipart/x-www-form-urlencoded:
           schema:
             type: object
             required:
               - name
               - age
             properties:
               name:
                 type: string
                 example: Sam
                 description: Name of the user
               age:
                 type: integer
                 example: 25
                 description: Age of the user
     responses:
       "201":
         description: User created
         content:
           application/json:
             schema:
               type: object
               properties:
                 id:
                   type: integer
                   example: 192
                   description: ID of newly created user
       "500":
         description: Server error
         content:
           application/json:
             schema:
               type: object
                 properties:
                   message:
                     type: string
                     example: An error occured while processing the request
                     description: Message describing the error
Endpoint /user/<user-id>: path parameters and schema reuse
Our second endpoint allows us to retrieve a single user's information. We start by defining the path and request method again:
 /user/{id}:
   get:
     summary: Retrieve a user
     description: Returns information about the user associated with this id
Note the {id} in the path: this is how you specify that a part of the request path is a variable.
Request variables from the request query or path are defined using the parameters key:
parameters:
  - name: id
    in: path
    description: Unique ID of the user
    required: true
    schema:
      type: integer
      example: 192
This takes a list of objects, but we only have one. We give it a name, declare that it is part of the request path using in: path and mark it as required.
For our responses, we either have either the user object as JSON or an error message. If we stop and think about it for a moment, both of these are used in multiple places: errors are part of all endpoints, and users are returned both from the current and the next one. This is a perfect opoortunity to define them as components:
components:
 schemas:
   Error:
     type: object
     properties:
       message:
         type: string
         example: An error occured while processing the request
         description: Message describing the error
All we did was copy everything under the schema key from the first endpoint's HTTP 500 response and paste it under a new root key (same indentation level as paths) called components, with the name Error. We can now reference it from the responses key of our endpoint with $ref:
responses:
 "500":
   description: Server error
   content:
     application/json:
       schema:
         $ref: '#/components/schemas/Error'
We can go back and do the same for the first endpoint. Every time we need to specify an error, we can now simply reference our Error component instead of having to copy/paste it everywhere. This is especially useful if we need to change something on it in the future.
After defining a User component and adding a HTTP 200 response, the second endpoint looks like this:
paths:
 /user/{id}:
   get:
     summary: Retrieve a user
     description: Returns information about the user associated with this id
     parameters:
       - name: id
         in: path
         description: Unique ID of the user
         required: true
         schema:
           type: integer
           example: 192
     responses:
       "200":
         description: Success
         content:
           application/json:
             schema:
               $ref: '#/components/schemas/User'
       "404":
         description: Not found
         content:
           application/json:
             schema:
               $ref: '#/components/schemas/Error'

components:
 schemas:
   Error:
     type: object
     properties:
       message:
         type: string
         example: An error occured while processing the request
         description: Message describing the error
   User:
     type: object
     properties:
       id:
         type: integer
         example: 192
         description: Unique ID of the user
       name:
         type: string
         example: Sam
         description: Name of the user
       age:
         type: integer
         example: 25
         description: Age of the user
Endpoints /users: Optional query parameters, default values and limits
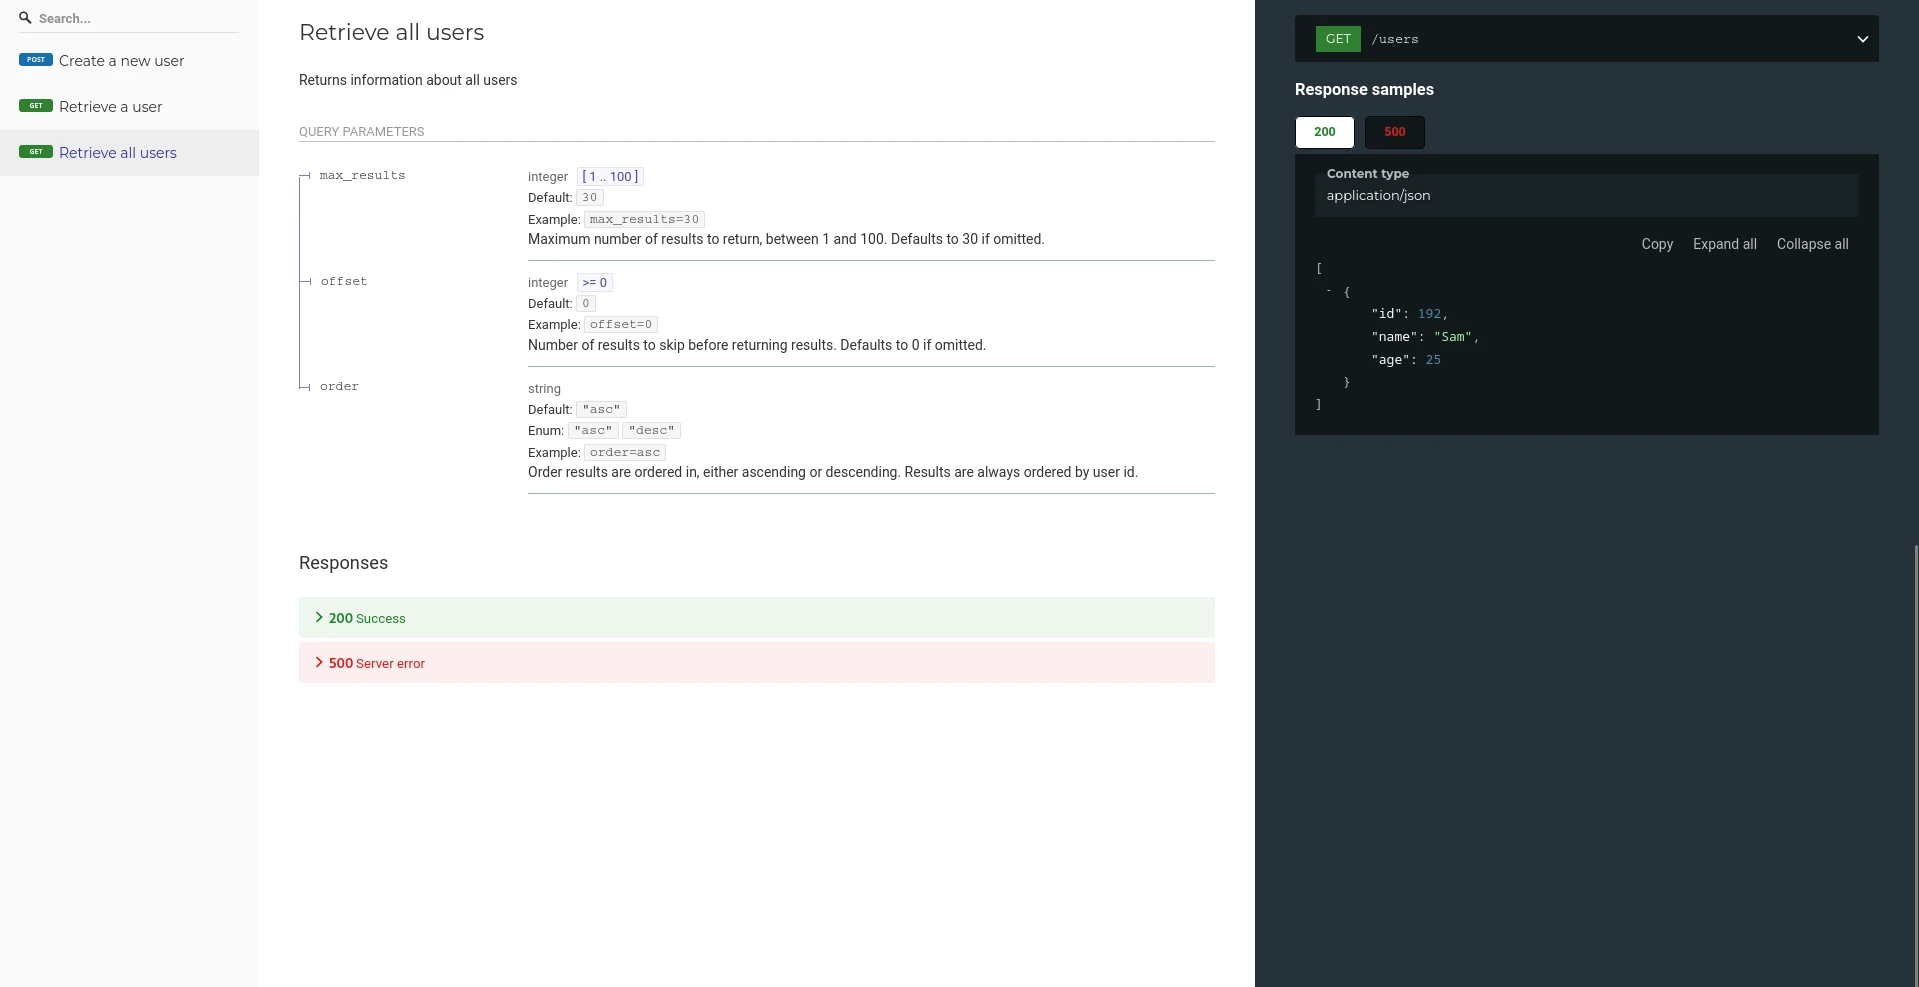
The last endpoint of our sample API returns an array of all users, with a limited amount of users per request and an optional offset to enable pagination.
Since we have already seen all the boilerplate code for an endpoint, let's only look at the parameters key for this one:
parameters:
 - name: max_results
   in: query
   description: Maximum number of results to return, between 1 and 100. Defaults to 30 if omitted.
   schema:
     type: integer
     minimum: 1
     maximum: 100
     default: 30
     example: 30
 - name: offset
   in: query
   description: Number of results to skip before returning results. Defaults to 0 if omitted.
   schema:
     type: integer
     minimum: 0
     default: 0
     example: 0
 - name: order
   in: query
   description: Order results are ordered in, either ascending or descending. Results are always ordered by user id.
   schema:
     type: string
     default: asc
     example: asc
     enum: [asc, desc]
This time, we have 4 parameters defined. They are all given in the url query, so we declared them as in: query. OpenAPI let's us easily define minimum, maximum and default values for each parameter. Taking a closer look at the last parameter order, we can see that it is of type string, but the allowed values are limited to asc and desc using the enum key.
The last point of interest here is the success reponse, which returns an array of user objects. We can simply define the return value as type array and declare it's items should be our User component from earlier:
responses:
 "200":
   description: Success
   content:
     application/json:
       schema:
         type: array
         items:
           $ref: '#/components/schemas/User'
The final documentation yaml file
Without further ado, here is the complete documentation file for our sample API:
openapi: 3.0.3
info:
 title: User API
 description: |-
   A sample API for user information
 version: 1.0.0
servers:
 - url: http://sample.com/api/v1

paths:
 /user:
   post:
     summary: Create a new user
     description: Stores a new user object
     requestBody:
       content:
         multipart/x-www-form-urlencoded:
           schema:
             type: object
             required:
               - name
               - age
             properties:
               name:
                 type: string
                 example: Sam
                 description: Name of the user
               age:
                 type: integer
                 example: 25
                 description: Age of the user
     responses:
       "201":
         description: User created
         content:
           application/json:
             schema:
               type: object
               properties:
                 id:
                   type: integer
                   example: 192
                   description: ID of newly created user
       "500":
         description: Server error
         content:
           application/json:
             schema:
               $ref: '#/components/schemas/Error'
 /user/{id}:
   get:
     summary: Retrieve a user
     description: Returns information about the user associated with this id
     parameters:
       - name: id
         in: path
         description: Unique ID of the user
         required: true
         schema:
           type: integer
           example: 192
     responses:
       "200":
         description: Success
         content:
           application/json:
             schema:
               $ref: '#/components/schemas/User'
       "404":
         description: Not found
         content:
           application/json:
             schema:
               $ref: '#/components/schemas/Error'
 /users:
   get:
     summary: Retrieve all users
     description: Returns information about all users
     parameters:
       - name: max_results
         in: query
         description: Maximum number of results to return, between 1 and 100. Defaults to 30 if omitted.
         schema:
           type: integer
           minimum: 1
           maximum: 100
           default: 30
           example: 30
       - name: offset
         in: query
         description: Number of results to skip before returning results. Defaults to 0 if omitted.
         schema:
           type: integer
           minimum: 0
           default: 0
           example: 0
       - name: order
         in: query
         description: Order results are ordered in, either ascending or descending. Results are always ordered by user id.
         schema:
           type: string
           default: asc
           example: asc
           enum: [asc, desc]
     responses:
       "200":
         description: Success
         content:
           application/json:
             schema:
               type: array
               items:
                 $ref: '#/components/schemas/User'
       "500":
         description: Server error
         content:
           application/json:
             schema:
               $ref: '#/components/schemas/Error'

components:
 schemas:
   Error:
     type: object
     properties:
       message:
         type: string
         example: An error occured while processing the request
         description: Message describing the error
   User:
     type: object
     properties:
       id:
         type: integer
         example: 192
         description: Unique ID of the user
       name:
         type: string
         example: Sam
         description: Name of the user
       age:
         type: integer
         example: 25
         description: Age of the user
Using the documentation
The yaml file itself is obviously not very user-friendly. To get it into a human-readable state, we can use generators. The most common one would be the swagger editor, providing live html output as you write your documentation.
My personal favourite would be redocly, as the generated html is very easy to read and comprehend:
You can run this locally using docker. Assuming you saved your spec as a local file named openapi.yml:
docker run -it --rm -p 127.0.0.1:8082:80 -v $PWD/openapi.yml:/usr/share/nginx/html/swagger.yaml -e SPEC_URL=swagger.yaml redocly/redocYou can now access the documentation at http://127.0.0.1:8082/
Generating code from the documentation yaml
Lastly, as promised, we will look at how to generate code from the yaml file. The tool of choice today is openapi-generator, because of it's ease of use and wide array of contained generators to choose from.
To get a list of all supported generators, you can run it directly from docker (without installing):
docker run --rm openapitools/openapi-generator-cli listThe list contains generators of different categories, like documentation generators that render human-readable representations of the documentation, client generators that write code for interacting with the API specified in the yaml file, and server generators creating boilerplate code for server implementations of the API.
To generate code from the yaml file, you need to save it locally, for example as my_api.yml. Then, mount the directory into the openapi-generator-cli container and provide the filename to the -i flag:
docker run --rm -v $PWD:/local openapitools/openapi-generator-cli generate -i /local/my_api.yml -g java -o /local/out/java-clientAnd just like that, you now have a new directory out/java-client containing a fully features java client library for your API. The generated client contains over 3000 lines of code you don't have to write yourself anymore!