Every user who touched a linux system has inevitably interfaced with it's user system, but using and understanding it are two very different beasts. This article aims to provide a more complete understanding of how users and groups on linux work, not just a guide to the most common commands (although they are included).
An introduction to users and groups on linux
In linux systems, users represent an account that can be logged into. Users have a unique username (aka login or username), user id (UID), primary group id (GID), home directory and default shell. Users can be part of many groups, but only one will be their primary group (GID). When the user creates a file, it will be owned by them and their primary group by default.
A user's primary group is commonly a private group by the same name as the user. For example, a user named tom will usually have a primary group named tom with them as the only member. This is a security feature to make files the user creates "private" by default (only they and a group only they belong to can access it), instead of implicitly sharing access to all files they create with other group members.
The home directory refers to a directory on the filesystem that is owned by a specific user. This place is used to store private files and for day-to-day computing tasks, where shared access is not necessary or wanted. User-specific files are stored in the user's home, like their shell configuration, private documents, local cache contents etc.
A user's shell is the program to start when a user logs in. It is called "shell" because it is a wrapper (shell) around the kernel, to allow users to access and control the operating system without making kernel calls directly. It is typically designed as a command prompt, where the user may execute a command and see it's output, looping until the user exits. The default shell is /bin/sh, but modern environments use more advanced shells like bash, fish or zsh, with bash being the most widely used option. The words terminal, shell, command-line and prompt are often used interchangeably, although they are technically not the same things.
System users and groups
Linux systems have two kinds of users: Normal users that humans log into and system users that programs use automatically. A system user will typically be locked, have no password and use /usr/sbin/nologin as their shell, which is a program that prints This account is currently not available. and exits, effectively preventing the user from launching a session even after a successful login. System users are often used by programs to manage separate file permissions or to "drop privileges" - a security mechanism of programs which need superuser privileges to start, where they change their own active user at runtime to a less privileged one after the part that needed higher privileges has run, or spawn less-privileged processes for the parts that don't need superuser access.
The nginx web server is a classic example of this: it needs superuser (root) privileges to listen on port 80(ports 1-1024 are reserved for root only), so the master process runs as user root. All other processes it spawns to handle actual connections and execute commands are run as an unprivileged system account, usually nginx or www-data. If one of these processes is compromised, they have very little access to the operating system.
System users and groups will typically be assigned UID and GID values <1000, while normal users and groups have UID/GIDs >= 1000. These values may differ if changes were made in /etc/login.defs. Many installable programs will create their own system users to operate, such as the MySQL or PostgreSQL databases, nginx or apache2 web servers, or the openssh server software.
Special users and groups
The most powerful user on any linux system is called root, with a UID of 0 and their corresponding group root's GID of 0. This account's home directory is located at /root instead of a subdirectory under /home, but the primary difference to other accounts is the fact that root implicitly has all permissions on a linux filesystem, effectively giving it access to anything they want. While using this account is very convenient for administrators, it is also a prime target for attackers, and can lead to severe accidental damage to the system, as they may well run commands like deleting the current kernel from disk or writing binary zeroes to a raw disk device, without the system questioning these actions.
The polar opposite of root is a user called nobody, with their group nogroup. This user's primary purpose is to drop privileges to, i.e. a running process may change it's active user to nobody in order to cut themselves off from as much operating system access as possible, once they do not require any privileges anymore. If the program were compromised, the access gained by the attacker would be that of nobody, which is as minimal as possible. nobody and nogroup will often have a UID and GID of 65534, which used to be the highest possible value in older 32-bit systems (modern 64-bit systems now have much higher limits).
Alongside the root and nogroup groups from the users discussed above, many linux systems may have other groups present to provide access to specific features:
sudoorwheel- Allows members access to thesudocommand, to run commands with superuser privileges. The namewheelis the default for RHEL-based distros, with debian-based ones defaulting tosudoas their group name.
admandsystemd-journal- These groups are used to give users access to system logs without providing other privileges. Theadmgroup owns most of the log files located in/var/log, while thesystemd-journalgroup allows running commands likejournalctlto view system-wide log messages. Some modern distributions have started giving members of theadmgroup access tojournalctlimplicitly.
audio,videoandplugdev- Provides access to device categories, such as audio devices (audio), graphics cards (video) or removable devices like usb thumb drives (plugdev).
Program-specific groups like
docker. Since running docker containers could aid a user in circumventing privileges, giving access to all users is a poor choice. Instead, only members of thedockergroup may run the docker program. This reduces the attack surface significantly and is a common way to restrict access to programs that may be misused.
Depending on system configuration, there may be more groups with implicit permissions attached to them, for example to manage printing capabilities or network access.
/etc/passwd and /etc/group
Linux users are stored in the file /etc/passwd, along with most of their public information. The file contains one user per line, in the format
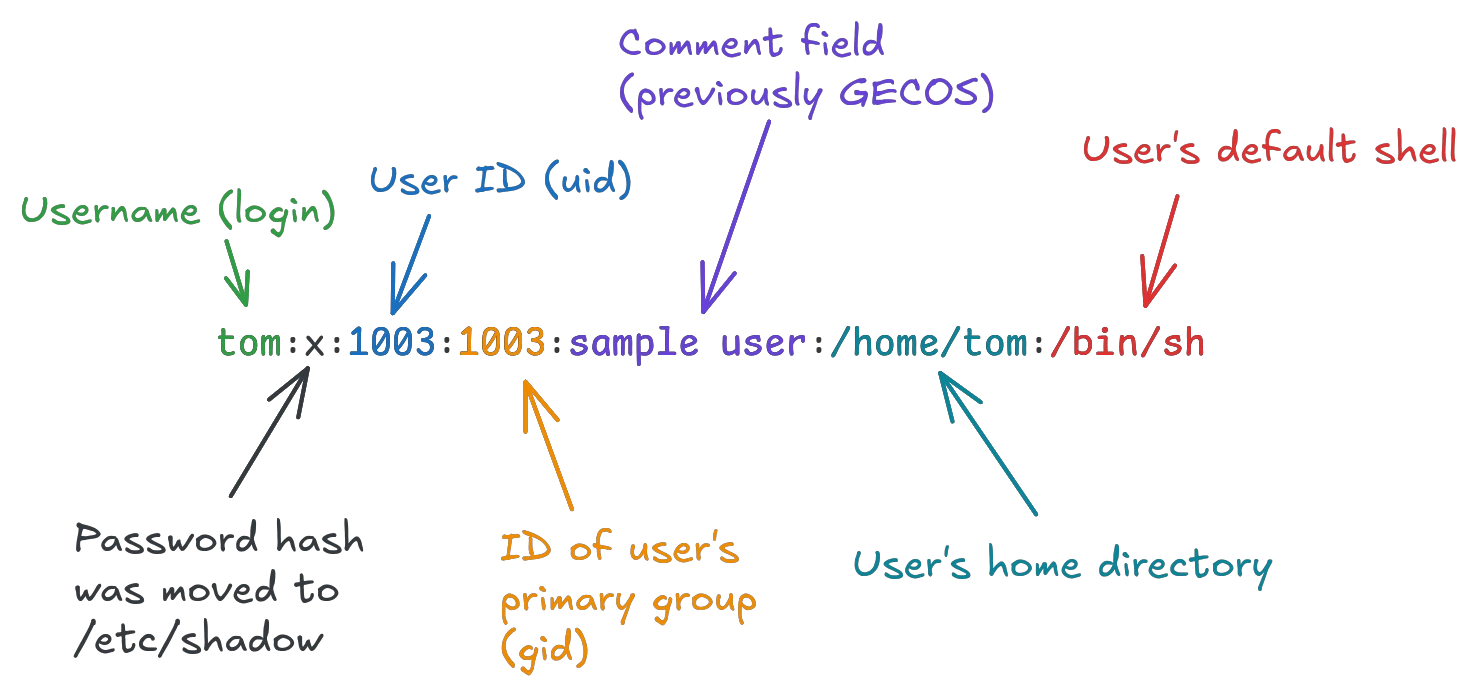
The comment field was initially intended for GECOS formatted data about real name, room number etc, but has since moved to a free-form comment instead, as the old predefined data is not very useful in modern systems.
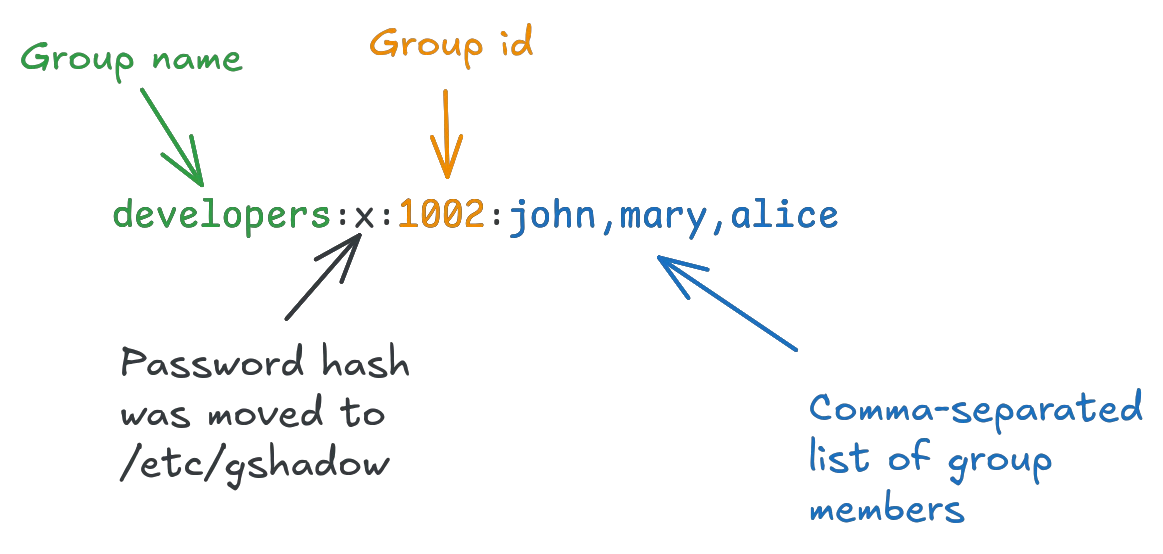
Similarly, public group information is stored in /etc/group, one group per line
Shadow files
Originally, the passwd file also contained the user password hashes, but this had a serious problem: The file /etc/passwd had to remain readable by all system users, because many tools needed the public user information to work (e.g. the ls command uses it to map a file's UID to human-readable usernames). Storing the password hash in a file readable by all users exposes the hash to every user, giving much more attack surface to brute-force attacks. To prevent this, security-related information was moved to /etc/shadow, and the password column in /etc/passwd contains an x to signal that the password can be found in the shadow file.
The /etc/shadow file stores more than just the password hash, but follows the same format as /etc/passwd:
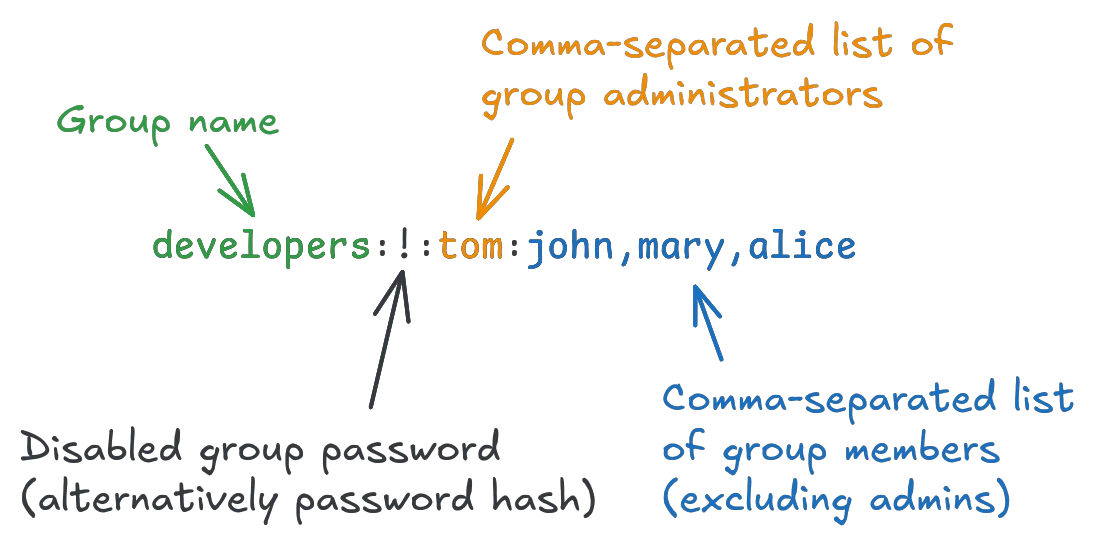
Sensitive information about groups follows the same approach, storing protected data in /etc/gshadow
Only root has read permissions on /etc/shadow and /etc/gshadow, keeping user and group password hashes protected from unprivileged users.
The password hash fields may contain !, * or !* (optionally followed by a password hash) to indicate that a user or group is locked (users cannot login with password, groups cannot be joined by group password). The value !! has the same effect, but conves the context that no password has been set for the account (it is still treated as locked). An empty password field is used for passwordless login to users or groups.
Useradd vs Adduser
When managing users on linux systems, you may run across two very similar commands: useradd and adduser. The useradd command is the primary command to create users, available on all linux systems, but debian-based systems also include the adduser command by default, which is a perl script wrapper around useradd. The primary goal was to provide easier commands for humans, that include interactive prompts during creation and make default values more exposed to operators. Thes wrapper scripts are frequently cause for confusion, especially because some RHEL versions symlinked adduser to the useradd command, but also because they aren't available on distributions that are not based on linux debian.
As a rule of thumb, if the command starts with "user" or "group", it is the standardized linux command for the task: useradd, usermod, userdel, groupadd, groupmod, groupdel. Commands starting with "add" or "del" are only available on distros from the debian family (or may be symlinked to other commands): adduser, deluser, addgroup, delgroup. For consistency, only use the standardized commands and stay away from the wrapper scripts.
Creating users
To create users, the useradd command is used. The possible way is simply
sudo useradd johnA new user is created, which you can view with the id command:
id johnThe output will look similar to this:
uid=1004(john) gid=1004(john) groups=1004(john)You may notice that the new users has values you didn't specify in the command (shell and home directory). These were filled in from default values in /etc/default/useradd. You should manage default directly from the useradd command instead of this config file. You can view all defaults using the -D flag:
sudo useradd -DAny default value can be changed with the same flag used to set the value for a user, as long as -D is the first flag given for the command. For example the -s flag specifies a shell for a new user:
sudo useradd -s /bin/bash jimBut using it with -D instead changes the default shell for new users:
sudo useradd -D -s /bin/bashSome other default values may be missing from useradd's defaults, because they are system-wide authentication defaults instead. Settings like the numeric ranges which are used for normal or system account UIDs/GIDs are defined in /etc/login.defs instead. If you cannot find a default setting with useradd, you will likely find it in here.
When creating users, you will often want to create a home directory for them at the same time. The -m flag is almost always the best choice to have the system create a directory under the default home location (usually /home) with the name of the newly created user. You could also specify an absolute path, but sticking to the standards will keep your system more coherent.
sudo useradd -m tomThe newly created home directory may contain some default files like .bashrc or .profile. What files are placed into generated home directories can be controlled through the /etc/skel directory. All the contents inside that path are copied to newly created user home directories (with ownership changed to that user). If you want all new users to receive a file in their home directory by default, simply put it in the /etc/skel directory.
There are many more options for useradd to create users with custom shell programs, including passwords etc. Take some time to get familiar with it's manual:
man useraddModifying and removing users
Changing public user information is done with usermod, supporting many of the flags used by useradd, for example -s to change the shell for a user:
sudo usermod -s /bin/sh johnBe careful when making changes to users. For example, changing a user's name with the -l option won't change the name of their home directory, but changing their UID will change the owner UID of all files they created previously. Carefully read the comments for each option in man usermod before using them.
Changing user passwords is done using the passwd command. As opposed to usermod, passwd takes plaintext passwords and hashes them automatically (usermod expects an already encrypted password hash).
sudo passwd johnThe command will prompt for a new password, then ask for the same password again (to prevent typos):
New password:
Retype new password:
passwd: password updated successfully
Removing a user can be done with userdel, typically including the -r flag to also remove their home directory:
sudo userdel -r johnThe -r flag is smart about the way it removes user directories: if the directory is shared with another user, or not owned by them (common for system accounts), they won't be removed (but you can force their removal anyway with -f if needed).
User expiration & password aging
Expiration and password aging controls are supplied through the chage command.
A user's current expiration policies can be viewed with -l:
sudo chage -l johnThe command shows all possible expiration policies with the values configured for user john:
Last password change                                : Aug 15, 2024
Password expires                                    : never
Password inactive                                   : never
Account expires                                     : Jan 02, 2020
Minimum number of days between password change      : 0
Maximum number of days between password change      : 99999
Number of days of warning before password expires   : 7
A user can be configured to automatically expire after a set date specified with -E in the format YYYY-MM-DD:
sudo chage -E 2020-01-02 johnThis makes user john expire on January 2nd 2020. When trying to log in after this date, they will see this message instead of their shell:
Your account has expired; please contact your system administrator.User expiration can be cleared by setting the expiration date to -1:
sudo chage -E -1 johnPasswords can also be configured to expire, but with a few more options. A password aging policy may define the minimum amount of days between password changes, how long the same password can be used before it must be changed, and when to warn the user to change their password:
sudo chage --mindays 7 --maxdays 90 --warndays 7 johnThe above policy will only allow user john to change their password every 7 days, but require it be changed at least every 90 days. They will be warned 7 days before their password expires.
User expiration and password aging can be combined for system security automation, by automatically locking users when their password change is overdue for a specified amount of time. The --inactive flag sets the number of days to wait after the user password expired, automatically locking the user if they do not renew their password in that time:
sudo chage --inactive 7 johnFor setups with many linux systems, this approach helps minimize access of employees that have since left the company, automatically locking their users out of the system after some time.
Global default values for user password expiration may be configured in /etc/login.defs.
Changing your own user account
While most commands for user management require root privileges, users have a few commands at their disposal to make changes to their own user accounts. The passwd command can be used by unprivileged users to change their own password, but they will need to confirm their current password (root does not require this step). Additionally, chsh allows users to change their own default shell program.
Impersonating users
A user may temporarily switch to a different user account using the su command. When run as root or with sudo, this switches to any user instantly:
sudo su johnUnprivileged users can also use the command, but must type the target user's password before being allowed access:
su johnWhen switching to users that do not have a valid shell set (like system accounts using /usr/sbin/nologin), a different shell can be specified with -s:
sudo su john -s /bin/bashWhen done, simply type exit to switch back to your original user session.
Enforcing password quality
Although not quite part of common user administration, it is important to understand that linux does not enforce any rules on user passwords by default. Using aaaa or 123 as user passwords is perfectly fine when left untouched.
A fix for this security issue is to install the PAM modules pwquality to define rules for password strength, and pwhistory to prevent users from reusing old passwords.
Install the modules if they are not already present:
sudo apt install libpam-pwquality libpam-modulesThen configure PAM to use them by adding these lines to /etc/pam.d/common-password
password requisite pam_pwquality.so retry=3
password required pam_pwhistory.so use_authtok remember=5
Make sure to add the lines before the line including pam_unix.so. If you are unsure, just prepend them to the top of the file.
Finally, define your own rules for password strength in /etc/security/pwquality.conf (the comments in the file explain all possible options).
Creating and removing groups
Similar to users, groups can be created with groupadd:
sudo groupadd testgroupGroup members can be specified while creating a group with -U, specified as a comma-separated list of usernames:
sudo groupadd testgroup -G jim,john,tomRemoving a group is done with groupdel:
sudo groupdel testgroupIf a user has the group set as their primary group (GID), it can only be removed by force with the -f flag.
Managing group members & admins
Groups can have any number of members, each either a normal member of group administrator. Groups are primarily a way to share file or folder access between users, but may also be used by some programs to restrict command access.
A user can be added to a group through gpasswd with the -a flag
gpasswd -a john testgroupAnd removed with the -d flag:
gpasswd -d john testgroupGroup administrators can be defined with -A:
gpasswd -A tim testgroupBe careful when changing group admins: the command replaces the list of group admins, so any name not listed in the command will lose admin access if they previously had it.
Group administrators have some additional privileges within a group, for example to add/remove group members or to set/clear the group password.
Joining groups by password
When running the gpasswd command on a group without flags, it allows setting a group password:
gpasswd testgroupGroup passwords can be changed by group administrators, or any user with root/sudo privileges.
The password may then be used by a user to add themselves to the group by running newgrp:
newgrp testgroupIf they provide the correct password, their primary group (GID) will temporarily change to the new group. Similar to the su command, this start a new sub-session with the altered group information, and can be quit by typing exit, returning to the normal GID shell.
While the ability to temporarily give users access to a group can be convenient when dealing with contractors or a class of students, it is also a security risk: There is no control over who that password is shared with, and auditing who had access to what groups may be tricky. Additionally, these temporary group changes arenot reflected in /etc/group or /etc/gshadow, making it impossible for group administrators to know who else may be using the group.