When applications grow, they eventually need to scale beyond a single server. Nginx is often the tool of choice for the task of load balancer, as it has proven efficient and stable in production environments around the world for decades. While nginx makes it easy to configure as a load-balancing reverse proxy, inexperienced users may miss some of the configuration options needed to make the most of the setup.
The use of load balancing
Load-balancing simply refers to using a single point of entry (reverse proxy) to forward an incoming request to one of multiple possible backend servers.

This practice typically aims to solve one or more of these problems:
Too much traffic: Servers cannot serve an infinite amount of requests. How many requests can be served exactly depends on many factors, like the server hardware, network throughput or the cost of the request. Uploading a large file to a server will vary in speed depending on the server's disk speed, current bandwidth usage, processor, or even less technical factors like physical distance between the client, reverse proxy and backend server. Having more servers ready to accept connections cuts down on waiting times and distributes the hardware load between multiple servers.
High latency: Latency is the time taken from sending a request to receiving a response. If a request takes longer (for example because it has to wait for a database query), it may cause other requests to be queued instead of immediately processed. Additionally, if a server needs to handle so many connections that it runs out of bandwidth capacity, all connection speeds will drop. In this scenario, even if the response is immediately available, it will be transferred slower than usual, resulting in delay.
Service outages: When a server fails, the application is unreachable. In a load-balanced scenario, the bad server will stop serving requests, but all other backend servers still run fine, resulting in only partial and temporary downtime for the overall service.
Basic load balancing config
A very basic load balancing reverse proxy configuration consists of two things: an upstream block containing all the backend servers handling the requests, and a server block defining the reverse proxy settings, like what port / domain(s) to listen on and how to forward requests to the backend.
http {
    upstream my_backend {
        server backend1.example.com;
        server backend2.example.com;
        server backend3.example.com;
    }
    server {
        listen 80;
        server_name example.com;

        location / {
            proxy_pass http://my_backend;
            proxy_set_header Host $host;
            proxy_set_header X-Real-IP $remote_addr;
            proxy_set_header X-Forwarded-For $proxy_add_x_forwarded_for;
            proxy_set_header X-Forwarded-Proto $scheme;
        }
    }
}
The upstream block named the backend servers my_backend, which is used as the forwarding target in proxy_pass. Note the proxy_set_header directives for X-Real-IP and X-Forwarded-For: When using a reverse proxy, the backend server handling the request will always receive requests from the reverse proxy, so the actual client's IP address is forwarded through HTTP headers instead. If you do not override headers like X-Real-IP, a malicious client may spoof (fake) their IP address and the backend has no way of noticing the client IP is not correct.
Load balancing strategies
A load balancing strategy describes how incoming requests are divided onto the backend servers. Nginx supports several strategies based on your requirements:
Round robin: This is the default strategy, it simply forwards requests to the backend servers in the order they were specified in the
upstreamblock. Since this strategy ignores differences in processing time and server hardware, it may forward too many requests to slow or busy servers while others are idle and ready.
Least connections: As the name implies, this strategy forwards incoming requests to the backend server with the last active connections. This ensures a more efficient usage of backend servers, but it may still produce long latencies as faulty or slow servers receive requests that faster servers may have handled better.
IP hash: This strategy mainly exist to combat a specific problem: sessions. Many web applications default to using sessions backed by files on the local filesystem. For a single server, that works fine - but if a request may be handled by a group of servers, it falls apart. For example, server A receives a login request and starts a session for the newly logged in user, then redirects the user to their profile page. The request for the profile page is handled by a different backend server, which doesn't know about the session and throws an error. The IP hashing strategy uses the hash of the client's IP address to ensure their requests always hit the same backend server, mitigating this problem, albeit at the cost of sometimes very uneven load distribution across the backend servers.
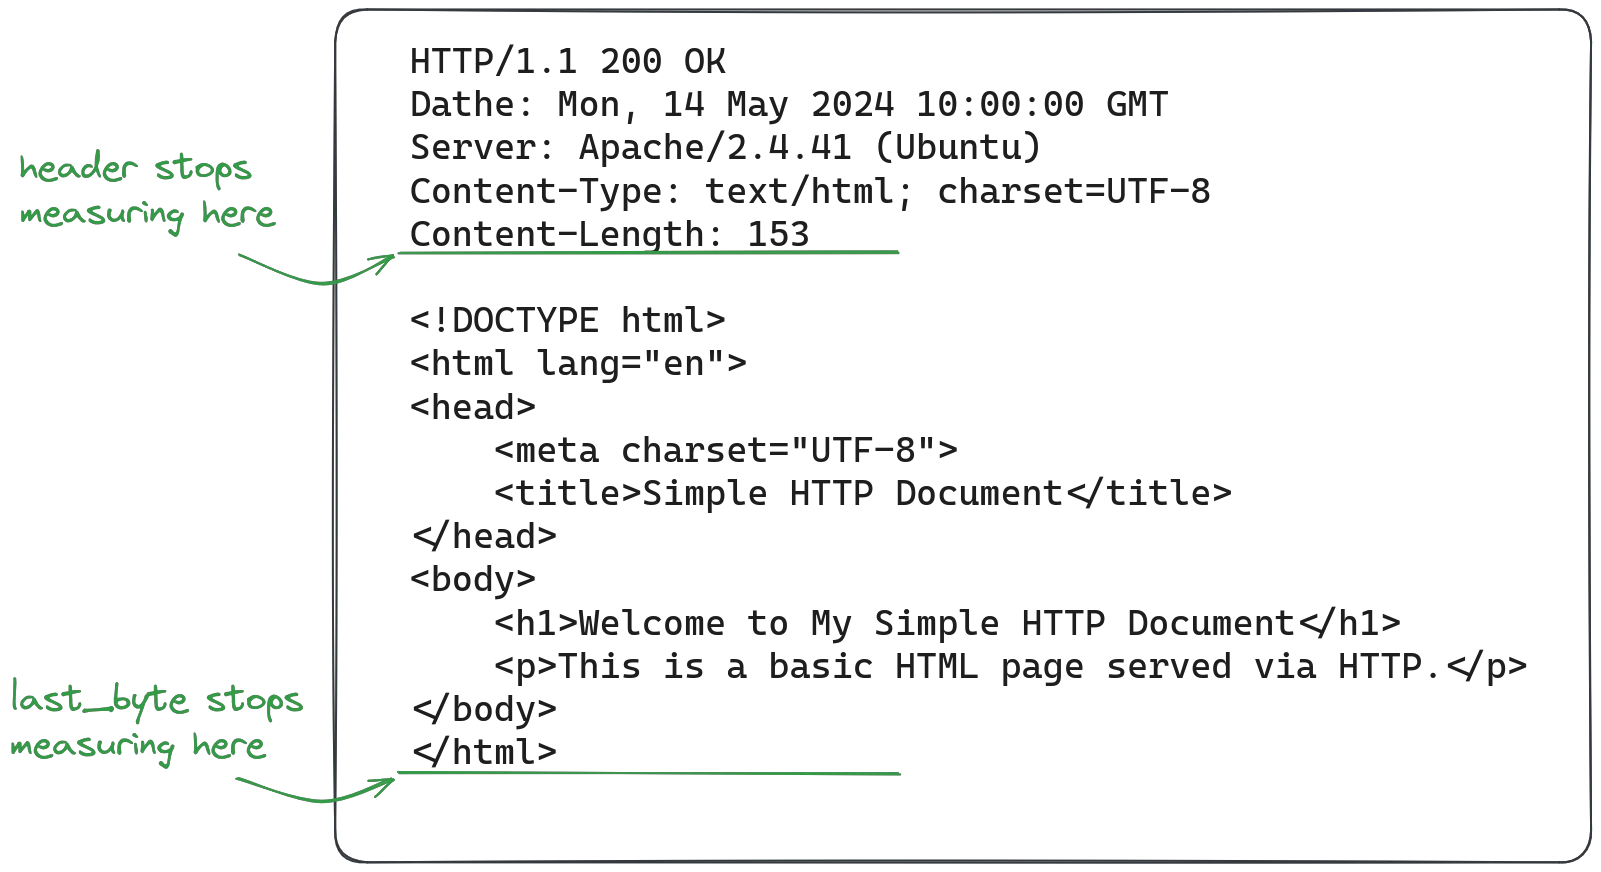
Least time: The least time strategy considers both the number of active connections per backend server and the response times, offering the most efficient distribution of traffic among the backend servers based on current load and capabilities.
To use a load balancing strategy, simply add it to the upstream block:
upstream my_backend {
    least_time header;
    server backend1.example.com;
    server backend2.example.com;
    server backend3.example.com;
}
Note that least_time uses the header mode: in this mode it measures the time taken to receive the response headers for the request. Alternatively, you may set it to last_byte to measure the time taken for the entire response, including the body. The effect of these modes may vary depending on how much response sizes vary and how large response bodies are.
Timeouts and health checks
To ensure requests are served by healthy backend servers, the nginx reverse proxy needs to continuously monitor the backend server responses and response times, so faulty servers can quickly be removed from the upstream config and incoming traffic is forwarded to healthy servers. This is done using both health checks and timeouts:
http {
    upstream backend {
        server backend1.example.com max_fails=3 fail_timeout=30s slow_start=10s;
        server backend2.example.com max_fails=3 fail_timeout=30s slow_start=10s;
        server backend3.example.com max_fails=3 fail_timeout=30s slow_start=10s;
        server backend4.example.com max_fails=3 fail_timeout=30s slow_start=10s backup;
    }

    server {
        listen 80;
        server_name example.com;

        # proxy timeouts
        proxy_connect_timeout 5s;
        proxy_send_timeout 10s;
        proxy_read_timeout 10s;

        location / {
            proxy_pass http://backend;
            proxy_set_header Host $host;
            proxy_set_header X-Real-IP $remote_addr;
            proxy_set_header X-Forwarded-For $proxy_add_x_forwarded_for;
            proxy_set_header X-Forwarded-Proto $scheme;
        }
    }
}
The timeouts in the server block may be a bit misleading at first: proxy_read_timeout is not the time allowed to read the entire response from the backend, but the time allowed to wait for more bytes inbetween reading chunks from the response, i.e. the time the server is willing to wait for new bytes to arrive when reading the response. The same is true for proxy_send_timeout and proxy_connect_timeout, so setting these to only a few seconds does not negatively impact backends serving large files, only slow responses.
In the upstream block, the attributes max_fails and fail_timeout work together: max_fails defines how many failed connections need to occur to mark the server as faulty (and stop sending incoming requests to it), fail_timeout defines both the duration the fails need to occur in, and the time the server will be considered unavailable. In the example above, if 3 connections to a backend server fail within 30 seconds, it will be unavailable for 30 seconds (not receive traffic). The slow_start value sets the time for the server to be fully "trusted" again: over this duration, only a portion of the traffic that would otherwise be proxied to it will actually be entrusted to it, increasing over the time period. In the example above, if a server fails and was unavailable for 30s, it will receive traffic again, but starting only at 10% of it's share of incoming requests, increasing over the 10s duration to 100% of it's traffic share (i.e. returning for normal). Note that slow_start does not work with the ip_hash load balancing strategy.
The backup attribute marks a server as a fallback in case another one becomes unavailable; it does not handle any requests if the other servers are healthy. In the example above, the server backend4.example.com will not handles requests until one of the others becomes unavailable. While another server is unavailable, it will be replaced by the backup server; once the unavailable server becomes available again, the backup server goes back to idle.
The paid subscription for nginx includes a health check module that checks backend server health in the background if you need more control over backend server health and more advanced health checks.
SSL offloading
SSL offloading, also called SSL termination, means the reverse proxy (or load balancer) receives HTTPS requests, but forwards them to the backend over raw HTTP (without encryption). The main benefit is performance: the request does not need encryption, so the CPU load for each request decreases significantly, both on the proxy server and on all backend servers.

This configuration has an obvious problem: the traffic between the proxy and backend servers is not encrypted anymore and could be read by someone with access to the network. If the proxy is forwarding requests to the backend servers over the internet, SSL termination is a bad idea. If the proxy reaches the backend servers over a connection that is private (local networks, VPC, or backend and proxy are on the same machine), or if the connection is already encrypted (VPN, SSH forwarding tunnel etc), then SSL termination on the load balancer is a great way to reduce processor load without any downsides.
Common pitfalls
Running a load balancer is fairly simple, but that doesn't mean it hides some unexpected issues when running in production:
Logging: While logging is important, not all logs are valuable. If the backend servers and the load balancer log handled requests, the size of logging output will effectively double, with only very little value from the backend servers. If access logs are desirable, consider only logging on the load balancer, and change the logging format to include which backend server handled the request, and log the times the client request/response took as well as how much time of that was spent on the backend server.
Keepalive: Depending on the type of application running on the backend servers, enabling keepalive requests between the proxy and backend can reduce overhead per request, as the underlying TCP connection is reused and the TCP handshaked skipped, or they might cause issues with requests being queued instead of processed in parallel instead. Additionally, some applications may see significant performance increases when switching to older protocols like HTTP/1.0, as they may have access to smaller and more optimized libraries to handle the much simpler standard. Finding the correct setting requires either good knowledge of the backend server applications, or simple load testing.
Single point of failure: For services that use load balancing to enable high availability, it should be mentioned that the load balancer itself now is a single point of failure: if the load balancing server goes offline, it doesn't matter if the backend servers are working fine. Finding a solution to this problem is highly specific to your needs and infrastructure; you may be able to use dynamic IPs and reassign them when a health check fails, run a full haproxy setup in front of nginx or use DNS round-robin to reduce the impact of an outage, among others. Which approach is right depends on your and your application's needs.