Users of linux systems will inevitably encounter tar files sooner or later. They are an integral part of the linux ecosystem and a widely used solution to archive directories and files, specifically useful for backups and archiving needs.
What is tar?
In linux, tar (short for tape archive) is both a command and a file format. The tar command is used to work with .tar files. Tar files are archives: within a single file, they can represent many other files and directories, including file permissions, hardlinks etc. They are similar to other archive formats like zip or 7z, with some differences:
tardoes not have compression built into the file format. Instead, third-party compression tools are used to compress the archive filetarfiles are much more flexible than alternative archive formats, maintaining hardlinks, device nodes and user permissions properlytarfiles don't have an index of contents, so reading files from the archive or listing it's contents requires reading the entire file
These characteristics make tar a great format to store entire file hierarchies on linux systems, for example as backups or to transfer between hosts while keeping file permissions intact.
Basic tar command syntax
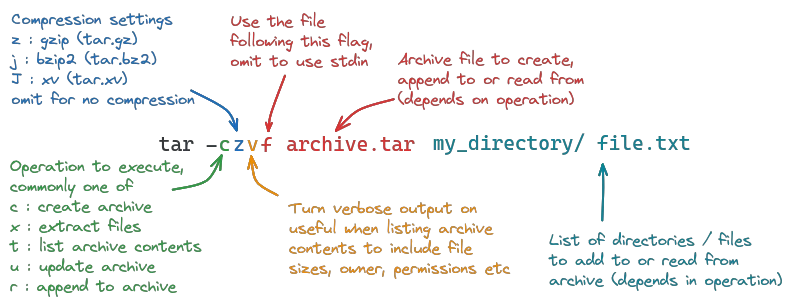
To work with tar archives, also called a tarballs, the tar command is used - it ships with most linux distributions by default. What the command does depends on flags passed to it, with the common syntax looking like this:
Creating tar archives
A plain tar archive can be create with the -c flag:
tar -cvf archive.tar data/This would recursively store the directory data/ and all it's contents in the file archive.tar.
If you want to use compression, you need to add another flag to specify the compression method to use:
-z(.tar.gz): Compresses the archive with gzip. Compression and decompression are fast but compression ratio is moderate; very low memory usage-j(.tar.bz2): Compresses the archive with bzip2. Compression is slow, decompression is very fast and compression ratio is high; moderate memory usage-J(.tar.xz): Compresses the archive with xz. Compression is very slow, decompression is fast and compression ratio is very high; high memory usage
Depending on your requirements, you may prefer one compression method over the others. Gzip is a good starting point, as it's performance impact is almost negligible. To create a gzip-compressed tar archive, simply add the -z flag to the tar command:
tar -czvf archive.tar.gz data/ Don't forget to change the file extension accordingly. If done properly, tar can handle compressed archives without needing any extra steps.
Checking archive contents
To list the contents of a tar archive, use the -t flag:
tar -tvf archive.tarThe output will look similar to this:
drwxr-xr-x demo/demo        0 2024-07-05 05:01 data/
-rw-r--r-- demo/demo       36 2024-07-05 05:01 data/sample.txt
-rw-r--r-- demo/demo       15 2024-07-05 05:01 data/README.md
Make sure to use the -v flag together with -t; without it, only the names of the contained files / directories are printed:
data/
data/sample.txt
data/README.md
You can narrow down the files you are looking for with wildcards:
tar -tvf logs.tar --wildcards '*apache2*.log'This would only list for files ending in .log with apache2 in their name or path.
You can combine the flags -O and -x to extract a file directly to stdout, letting you quickly read it's contents without extracting it to disk:
tar -xOf logs.tar var/log/apache2/access.log | lessAdding contents
There are two ways to add items to an archive. The first is to simply append them with -r:
tar -rf archive.tar new.txtThis adds the file new.txt to archive.tar.
If you want to append only files that differ from their counterpart in an archive, use the -u flag instead:
tar -uf archive.tar changed.txtIf the file changed.txt doesn't exist inside archive.tar, it will be added.
You can check which files would be updated by -u (and why) with the --diff flag:
tar --diff -f archive.tar data/The output will list all files that are different from their counterpart in archive.tar (if any):
sample/hello.txt: Mod time differs
sample/hello.txt: Size differs
Note that a file may be printed multiple times, like in the sample above. Each file is printed for each type of difference it has to the version in archive.tar, so if a file differs in multiple ways, it will be printed multiple times (one line per difference).
Note that neither -r nor -u work with compressed archives (like tar.gz or tar.bz2); attempting to add files to such an archive will result in this error:
tar: Cannot update compressed archivesHandling duplicate appended files
It is important to understand how appending to a tar archive works: Since tar is a stream format, it has no way to change files in place. Instead, it will simply add a new copy to the end of the archive. When using -r or -u, appending the same file multiple times will constantly grow the archive, adding more and more copies of the file (-u only if the file also changed from the last known version, -r every time it runs).
When listing the contents, you can see multiple copies of the same file:
tar -tvf archive.tar Will show duplicate entries:
drwxr-xr-x demo/demo        0 2024-07-05 05:01 data/
-rw-r--r-- demo/demo       15 2024-07-05 05:01 data/README.md
drwxr-xr-x demo/demo        0 2024-07-05 05:01 data/
-rw-r--r-- demo/demo       15 2024-07-05 05:01 data/README.md
A specific file can accessed (extracted, deleted etc) by specifying which version to use with --occurrence:
tar -xf archive.tar --occurrence=2 data/README.mdThis would extract the second file named data/README.md. Counting starts at 1, but using --occurence=0 will often behave the same.
There is no way to "replace" a file in a tar archive, but a similar effect can be achieved by recreating it. When extracting a tar archive with multiple files with the same path, only the most recent version is extracted. This behavior can be used to "remove" duplicates, by extracting and then recreating the archive:
mkdir temp_dir
tar -xvf archive.tar -C temp_dir
tar -xf archive.tar -C temp_dir .
rm -rf temp_dir
All duplicate entries will now be gone from archive.tar.
Deleting files
Deleting files in tar archives is done with the -delete flag:
tar --delete -f archive.tar data/sample.txtDeletion can also be done with wildcards:
tar --delete -f archive.tar --wildcards '*.txt' Don't forget to quote the wildcard value, or your shell may interpret the * character instead of passing it to tar.
Extracting archived files
Extracting tar archives is done with the -x flag:
tar -xvf archive.tarThis extracts all contents of archive.tar to the current directory. If you want to extract to a different directory, provide one with -C:
tar -xvf archive.tar -C other_dir/Now the contents of archive.tar are extracted to other_dir/.
You can also extract individual items by name:
tar -xvf archive.tar data/README.md example.txtOr several matching using wildcards:
tar -xvf archive.tar --wildcards '*.txt'Note that extracted files will include all parent directories when extracting. When extracting data/README.md, it will first create the directory data/ in the current working directory, then extract the file README.md into it.
This behavior can be prevented with the --strip-components flag, to signal how many parent directories should be stripped from path when extracting:
tar -xvf archive.tar data/docs/sample.txt --strip-components=1The example above strips one one path segment from the file path, starting at the left. This means that data/ is dropped and only docs/sample.txt is extracted to the current directory.
Working with streams
One advantage of tar is the fact that it can work with streams, without the need to operate on contents of known lengths. In practice, this means that it can be chained to other commands in the linux terminal. For example, you could use find to list the files that changed in the last 24h, and pipe the list to tar for archival:
find . -type f -mtime -1 | tar -czf archive.tar.gz -TNote that -T is necessary here to tell tar that stdin is a list of filenames to archive.
Tar can also work with stdin streams when the -f flag is missing, for example to download and immediately extract an archive (the httpd server in this example):
curl 'https://dlcdn.apache.org/httpd/httpd-2.4.61.tar.gz' | tar xvzThe primary case for working with streams is to save resources: instead of first downloading and writing the file to disk, then having to read the entire file again to extract the contents to disk, all of this is done in one go, requiring much less slow disk i/o and working in realtime.
This feature can also be used to get the advantages of compression over a network connection without dealing with compressed files:
tar -czf - local_dir/ | ssh user@example.com "tar -xzf - -C remote_dir/"Note the argument to -f is - instead of a filename, to tell tar to output the archive to stdout.
This command finds the contents of local_dir/, compresses them into a gzip compressed tar archive stream, which is then sent over ssh to the server at example.com, where it is extracted and decompressed to remote_dir/. All of these steps happen simultaneously, in chunks, so memory consumption and disk usage remain low, and there is no need for temporary files. The files transferred over the network are compressed, but neither the local nor remote files need any cleanup steps to decompress.
Incremental backups
Backing up large amounts of data that don't change frequently can be very inefficient. Such use cases typically prefer incremental backups, where a complete backup is taken once, and subsequent backups only record the changes made since the previous backup operation. The tar command has native support for such use cases.
First, take a complete backup:
tar -cvpzf full_backup.tar.gz data/ --listed-incremental=snapshot.fileNote the -p flag to maintain file permissions.
This will create two files: the full_backup.tar.gz archive, and the snapshot.file, which only contains information about what data/ looked like the last time it was backed up, so the next backup only records the differences.
To take another backup, run the command again:
tar -cvpzf incremental_backup_1.tar.gz data/ --listed-incremental=snapshot.fileMake sure to name the incremental backups in some sequential order (for example with ascending numbers or by including the current date/timestamp) - you will need to restore them in the order they were taken.
To restore the backup, start by extracting the full backup, then all incremental backups in order:
# full backup first
tar -xvpzf full_backup.tar.gz

# then incremental backups on top
tar -xvpzf incremental_backup_1.tar.gz
# ...